Tag Archives: delicious. magazine

April cook-a-long: Recipe reveal

Hello friends,

Here is the moment you have all been waiting for. The details for the April cook-a-long are here.

I have chosen a recipe that I hope you will find easy, fast and affordable.

The possibilities are endless. If you are not particularly fond of prawns, feel free to swap them for something you enjoy. Try chicken or a firm fish fillet or even fried tofu.

Don’t forget that this month’s cook-a-long will take place on Wednesday 10 April.

Once you are finished cooking, take a moment and capture a photo your meal. Post your picture and comments on the My Delicious Year Facebook page or share it on instagram using the hashtag #cookalong and tag @mydeliciousyear.

I can’t wait to see how you all go.

X Bree

2 Comments

Filed under April, Cook-a-long

Introducing the My Delicious Year monthly cook-a-long

What is it?

Join in for a once a month cook-a-long. On the first day of each month I will provide you with a recipe and shopping list. The recipe will be affordably priced and of easy to moderate difficulty.

When will it take place? 

The cook-a-long will take place on the second Wednesday of each month. An event will be created on the My Delicious Year Facebook page at the start of each month. Please join the group to stay up to date, and don’t forget to invite your friends to join in.

Where will the cook-a-long take place?

The idea is for you to cook the recipe in the comfort of your own home. Cook the selected recipe for your family, friends, neighbours or someone special. Once you are finished cooking, take a moment and capture a photo your meal. Post your picture and comments on the My Delicious Year Facebook page or share it on instagram using the hashtag #cookalong and tag @mydeliciousyear.

Why a cook-a-long?

One of the main goals I set when starting out on this blogging adventure was to inspire others to cook. The idea behind the cook-a-long is to encourage you to try a new recipe each month by making it accessible to all and as simple as possible. After the cook-a-long we can then come together as a group to talk about the recipe – like a virtual book club, but for recipes.

The first cook-a-long will take place on Wednesday 10 April.

I’d love to hear what you think about this idea and whether you will be participating.

X Bree

4 Comments

Filed under Cook-a-long, March

Pizza + cake = amazing pizza cake!

“Oooooh, I love a bit of cake. Oooooh, cake. Oooooh, cake. Cake. Cake. Cake. Cake. I’m just one of these people. I come home and I need a piece of cake.”Marjorie Dawes, Little Britain.

There’s no secret, I do love a bit of cake. I do love a bit of Little Britain too. Eating cake while watching Little Britain? Now you’re talking.

I have been known to be a bit partial to all things sweet when it comes to cake.

  • Honey sponge roll (a classic from my late grandma)
  • Chocolate cake for a crowd (the cake I’d make most weekends when I still lived at home with my parents)
  • No-bake cheesecake (which I perfected, and then somehow forgot how to make, much to my father’s disappointment)

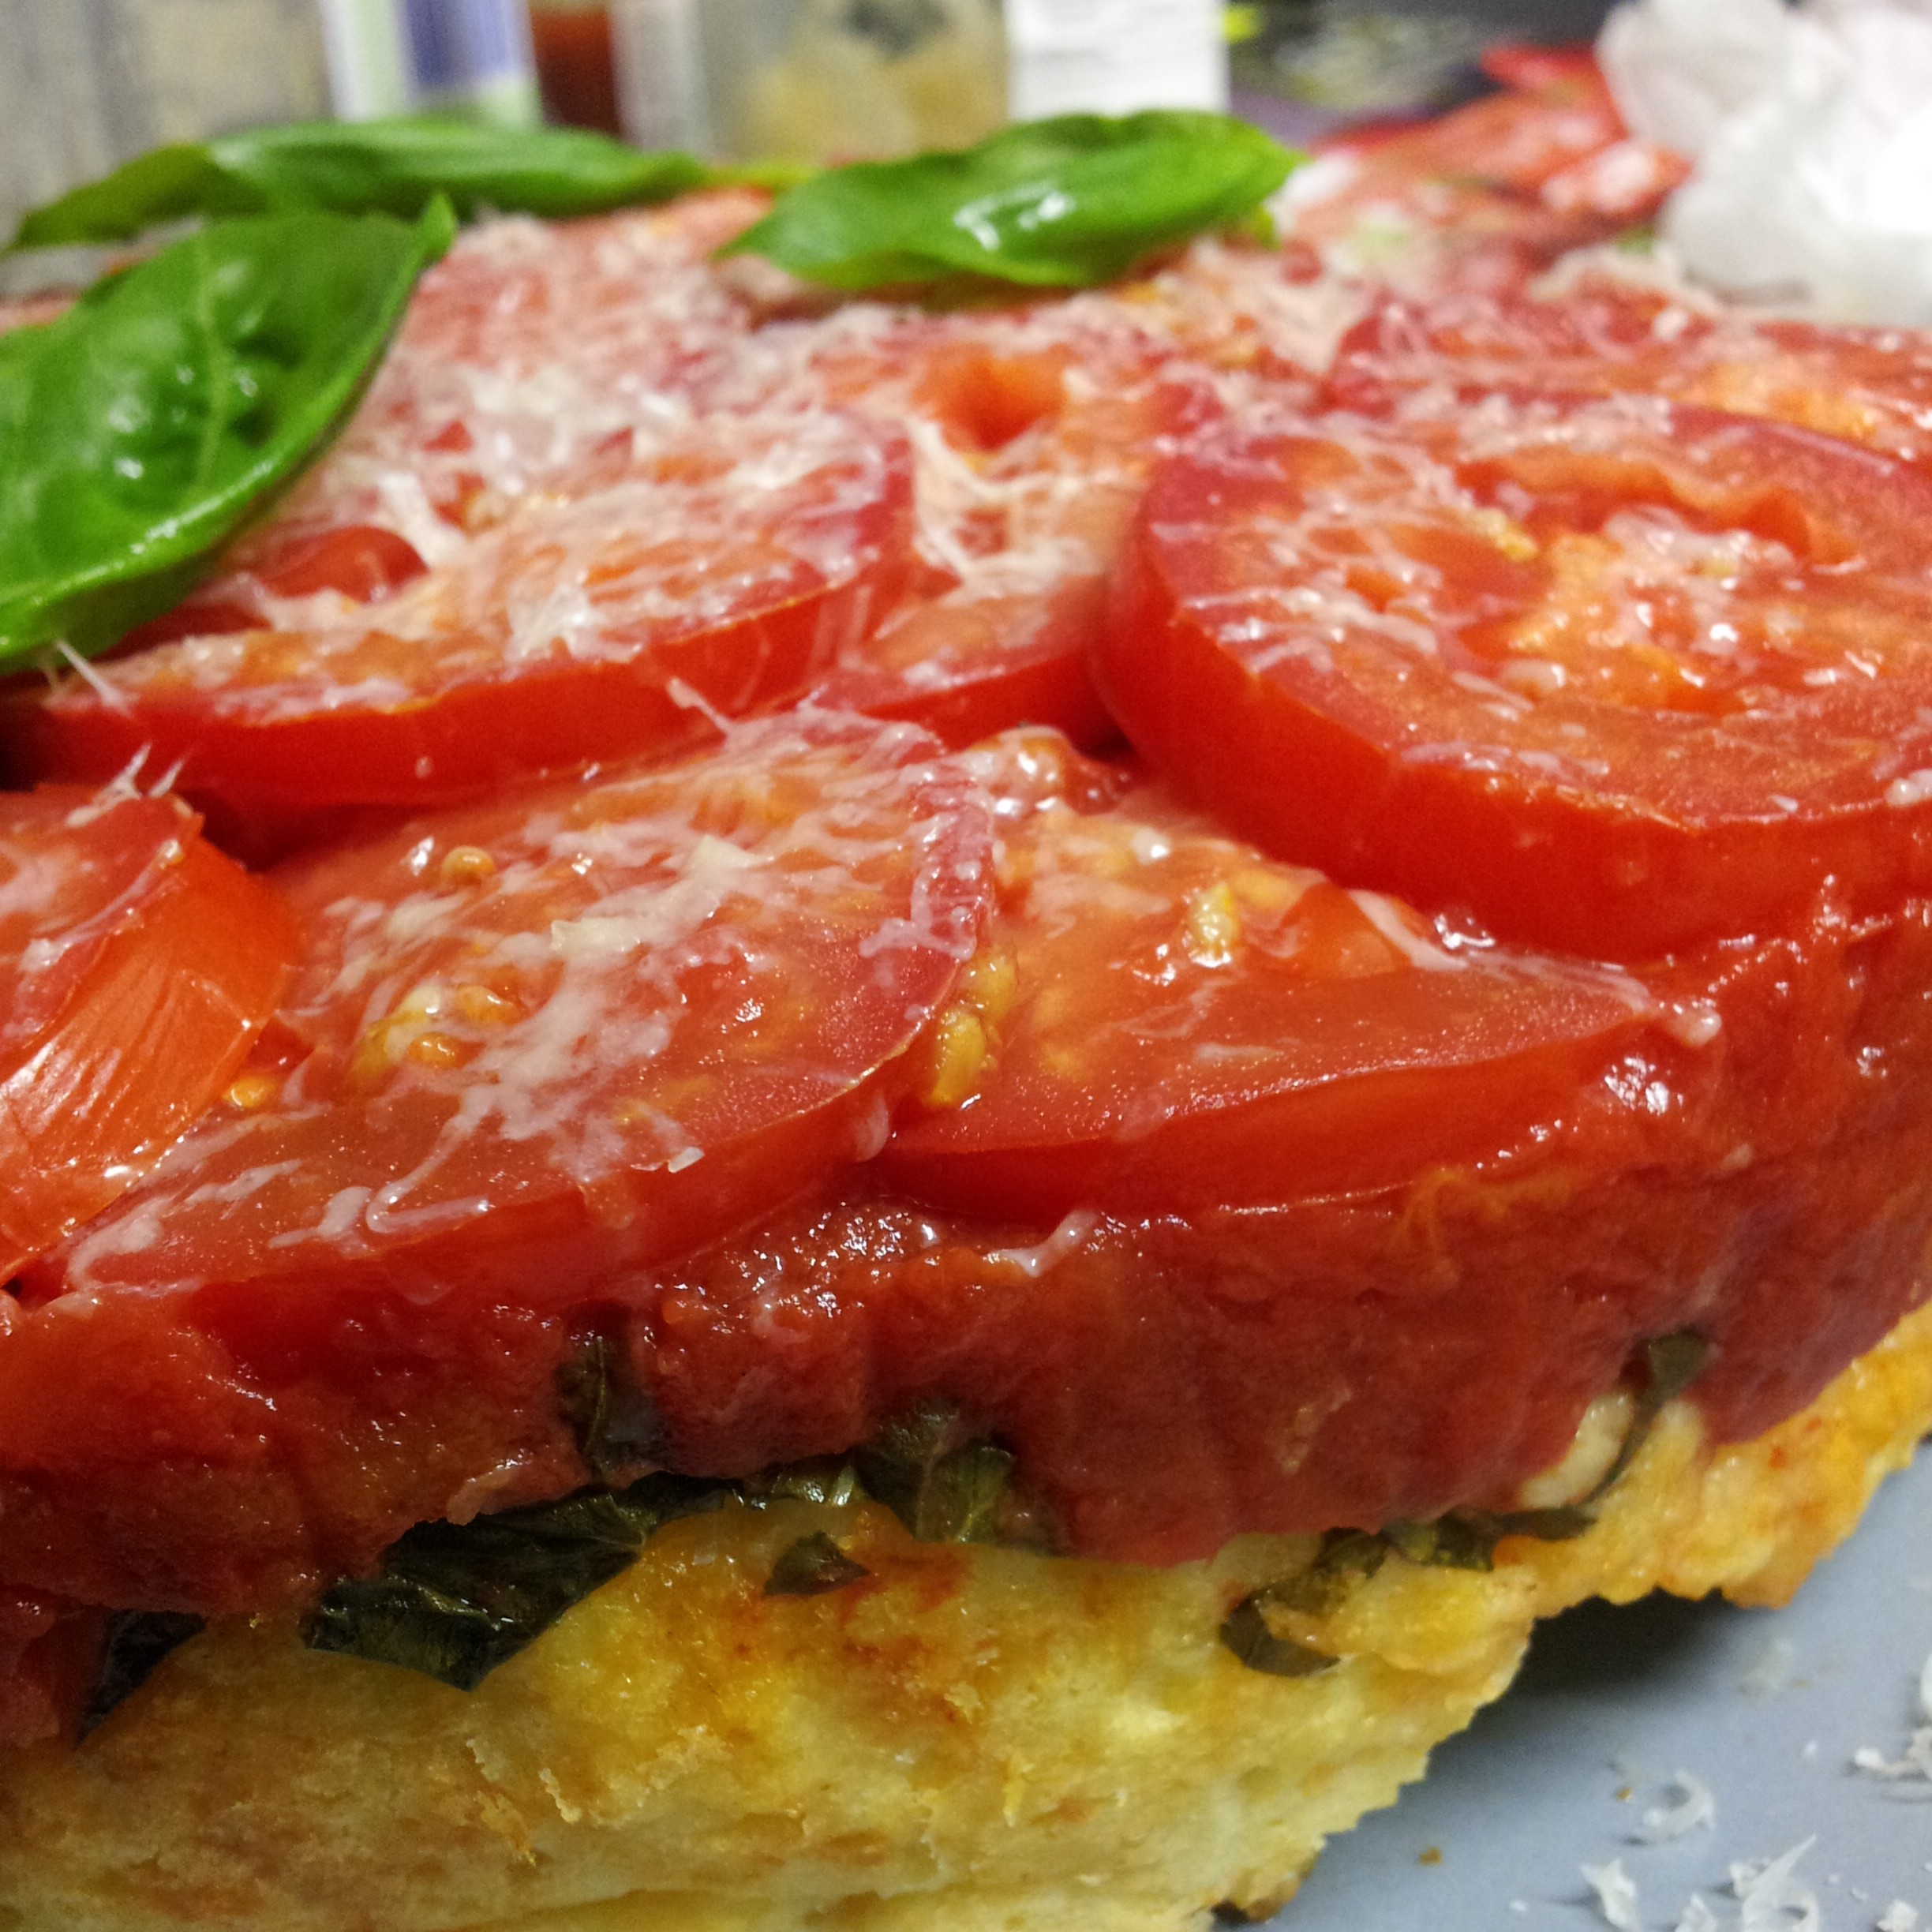
But now, the greatest invention to arise from my kitchen is the pizza cake, the savoury alternative. 

But of course it’s not actually called a pizza cake. It’s really a wonderful, easy, upside-down tomato & basil pie from the March 2007 delicious. magazine. A recipe from Belinda Jeffrey’s.

Clearly my taste buds have changed over time.  Back in 2007 when this recipe was printed, I was not drawn to it nor its author. But now, some six years later, I came across this recipe and knew I had to make it! It was something about the simplicity of the ingredients – tomatoes, basil, cheese. I instantly knew it would be a winner. But what I didn’t realise was how awesome it really was or the endless potential for this cake.

Let’s begin. This cake, in all its rustic beauty, is only as good as the ingredients you use. My suggestion is buy your tomatoes a couple of days before you are ready to use them and leave them on the bench to ripen further. Smell them. If they smell like tomato, use them. I also like to use organic tinned tomatoes. Don’t judge me. I think they are affordable and that you will taste the difference. As for the basil, grow your own. Or not. Basil. Yum. I can almost smell it while I am typing this.

Of course, in the pursuit of shortcuts in the kitchen, I broke all the rules, and chose to ignore Belinda’s carefully written instructions by placing all the “cake” ingredients into the food processor at once. No harm done. Amazing pizza cake!

Once you have carefully sliced your roma tomatoes and made a pretty pattern on the base of the pan you have chosen to use, carefully spoon the tinned tomatoes over the top. Next time I think I will actually mix the basil through the tinned tomatoes rather than sprinkling it on top. I think it will only improve the flavour.

When choosing your pan, don’t do what I did and use a springform pan. Big mistake. All the juicy goodness from the tomatoes kind of oozed out of the bottom of the pan and out into my oven. What a waste. Use a pie dish or something similar, but don’t forget to grease it and line the base with baking paper. Even if it is non-stick.

Spread the cake mixture over the tomatoes and bake in the oven as suggested. Check it after the cooking time is up to make sure it is completely cooked through. Bring it out of the oven, flip it onto your serving plate. Slice it up and devour! Amazing pizza cake!

After consuming more than our fair share of our newfound favourite amazing pizza cake, Mr Picky Palette and I slothed on the couch devising a list of the endless possibilities and potential for improving the already amazing pizza cake. Some of the combinations we thought of to stir through the cake mixture before baking included:

  • shredded ham and pineapple
  • shredded hot salami, sundried tomatoes and olives
  • jalapenos  (Mr Picky Palette’s idea, not for me thanks!)
  • small chunks of fetta and dried oregano
  • anchovies and oregano.

Let it be said that you will see this cake again this month.

When you make this cake it will be the most amazing, mind-blowing, wonderful, easy, amazing pizza cake you have ever tasted!

And I owe it all to Belinda Jeffrey’s. Thank you!

Eat it!

X Bree

Amazing pizza cake!!!

Amazing pizza cake!!!

A wonderful, easy, upside-down tomato & basil pie

Serves 6

delicious. magazine, (Mar 2007, p. 79)

This is one of my great stand-bys when I want something delicious that looks special but doesn’t take forever to make

800g can diced tomatoes
1 ½ cups (225g) self-raising flour
1 tsp dry mustard powder
100g parmesan, freshly grated
50g good cheddar, finely grated
125g cold unsalted butter, chopped
2 eggs
1/3 cup (80ml) milk
A couple of shakes of Tabasco sauce
6 ripe tomatoes (preferably roma), thinly sliced
1/3 cup finely shredded basil
Basil leaves, to serve

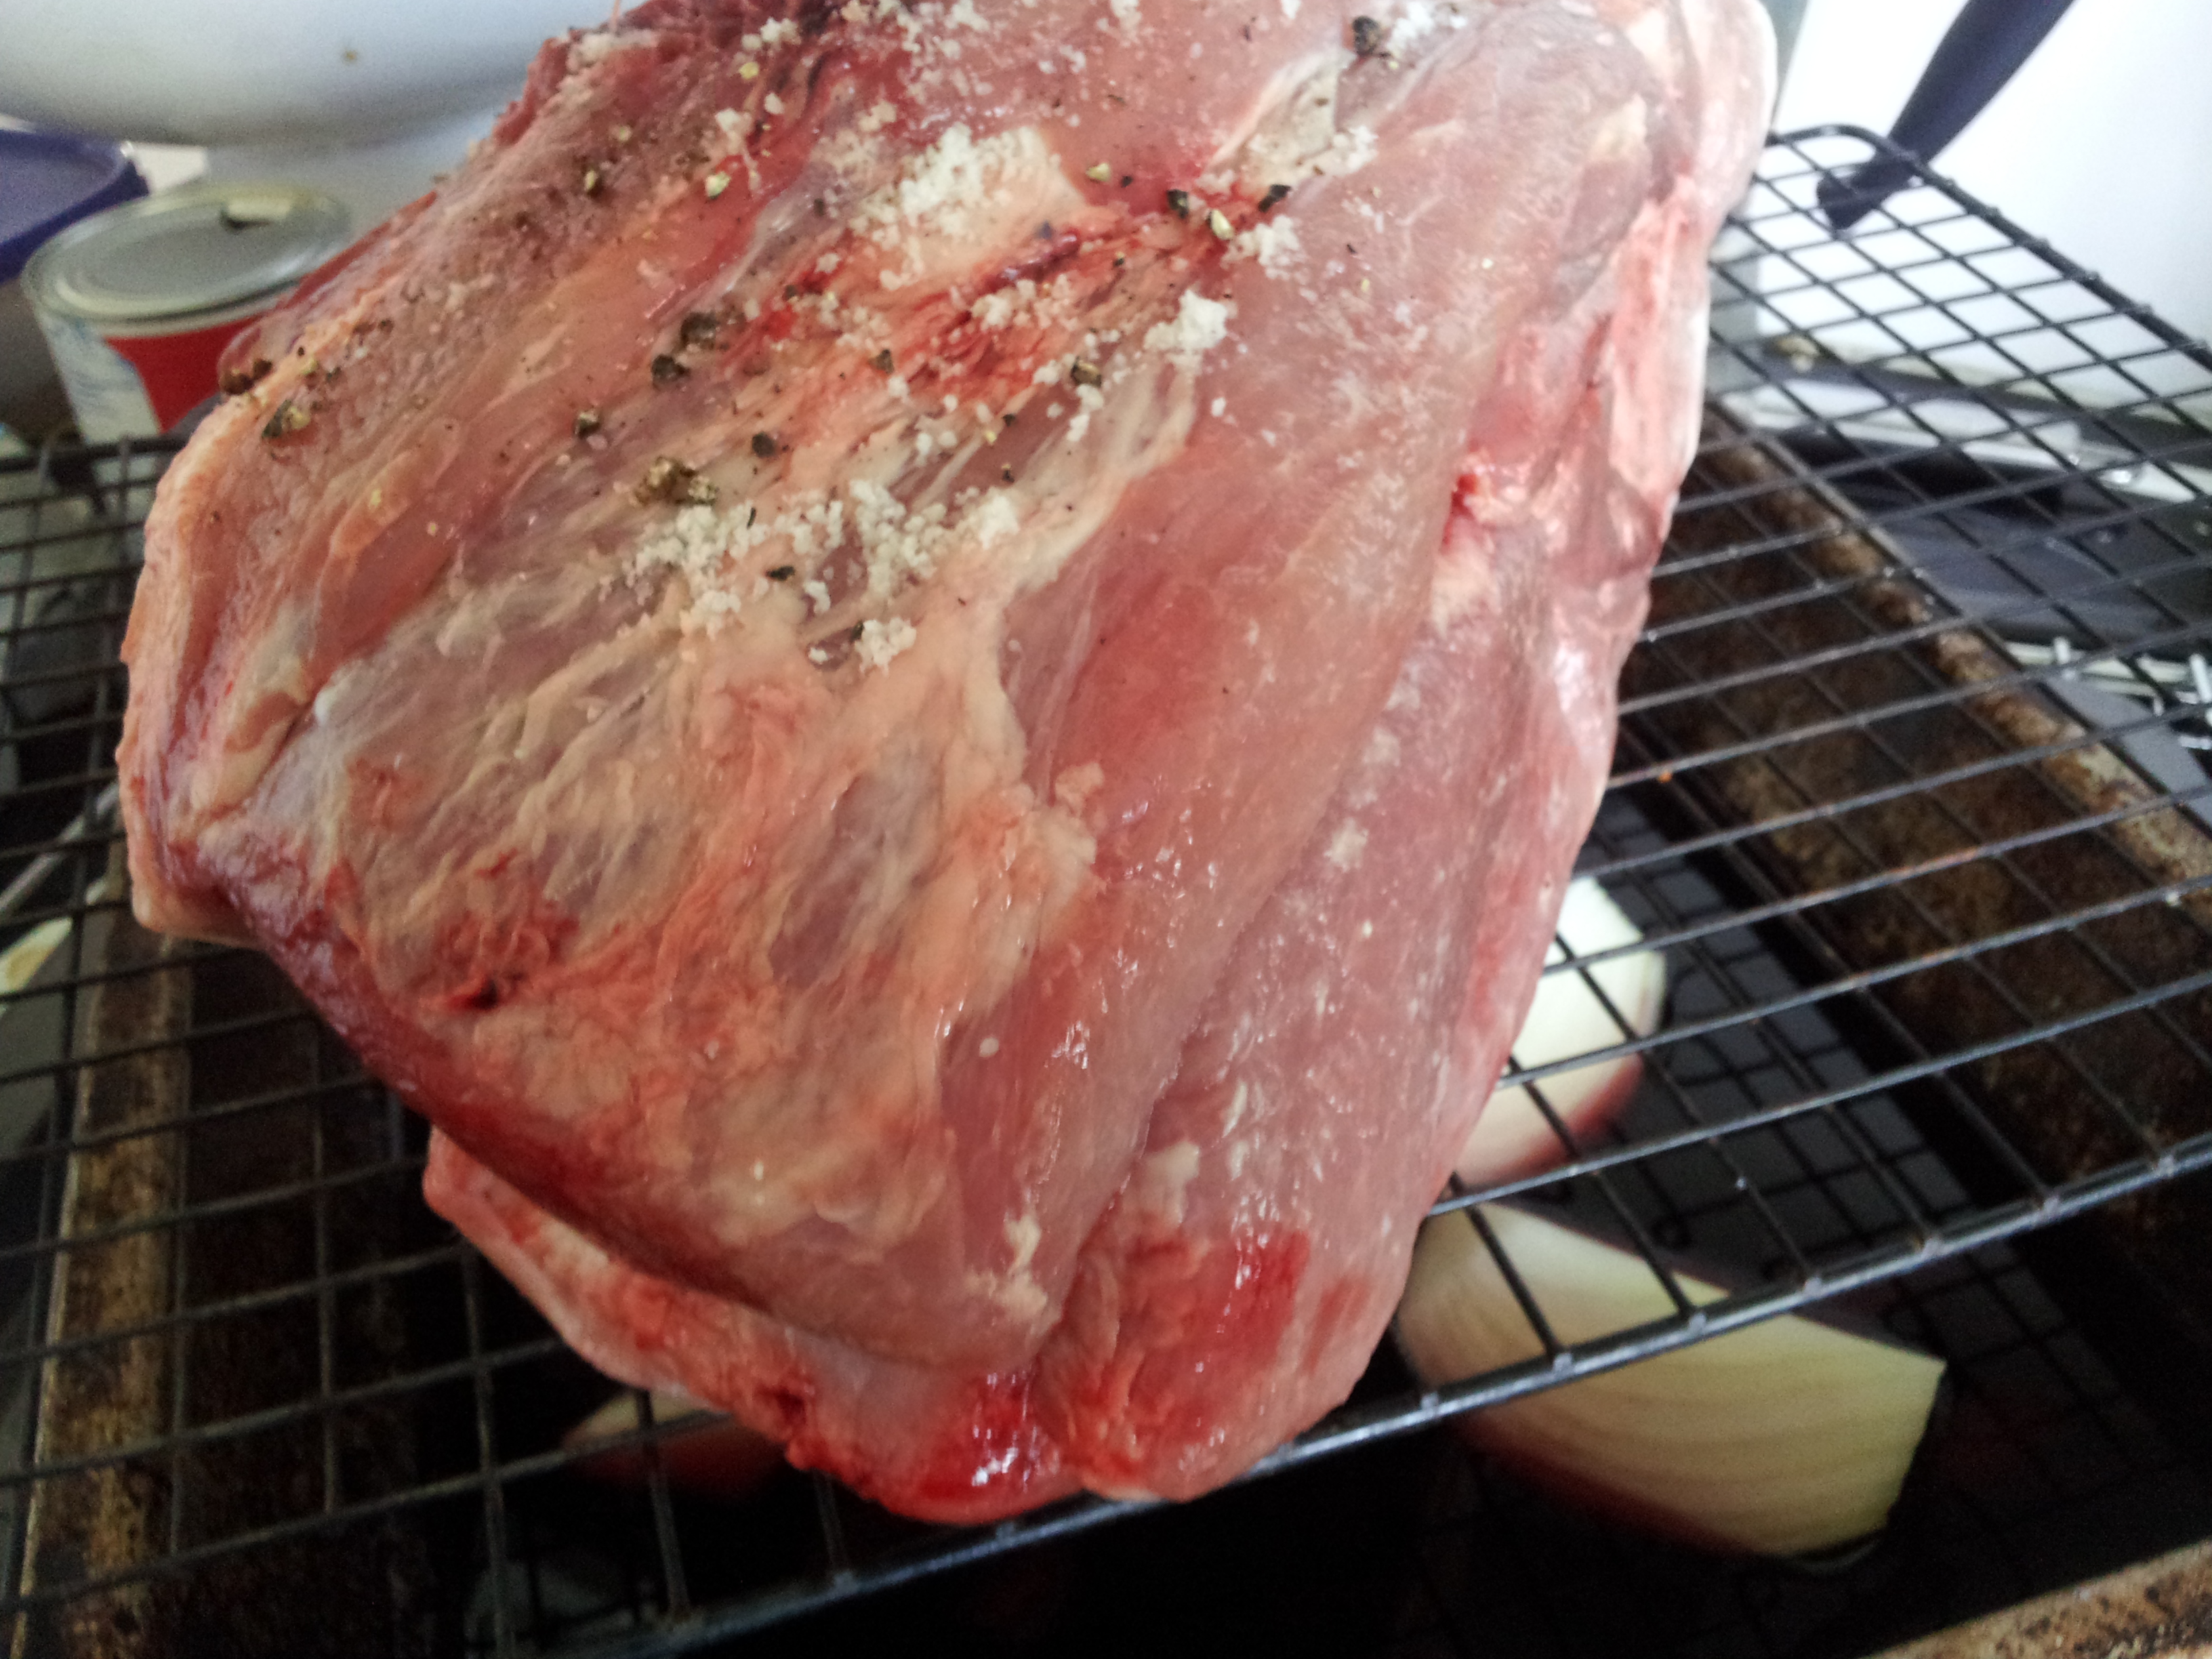
Preheat your oven to 180 degrees celcius. Butter a shallow 26cm round ovenproof dish and line the base with buttered baking paper. Set it aside.

Pour canned tomatoes into a sieve over a bowl. Leave to drain for 5-10 minutes. Give it a stir occasionally to make sure as much liquid seeps away as possible.

Meanwhile, whiz flour, mustard and 1 teaspoon of salt in a food processor. Add cheeses and whiz to just combine. Scatter butter over the top and process until the mixture resembles coarse breadcrumbs. (if you don’t have a food processor, you can do this in a bowl and rub the butter in by hand.) Tip mixture into a bowl.

In another bowl, whisk the eggs, milk and Tabasco. Make a well in the cheese mixture and pour in the egg mixture then stir to make a fairly stiff batter.

Lay the sliced tomatoes in overlapping circles in the base of the buttered dish so the bottom is completely covered. Spread drained tomatoes evenly over the top and sprinkle with the shredded basil. Dollop spoonfuls of the batter over the tomatoes, then, with lightly floured hands,pat it out with your fingers to spread it evenly. (Don’t worry if there are a few little gaps – they will fill out as the pie cooks.) Bake for 30-35 minutes or until the pie is risen and golden. (The time will vary a bit depending on how thick your dish is.)

Test it by inserting a fine skewere into the pie, if it comes out clean the pie is ready. Remove teh pie from the oven and leave it to settle in the dish for 5 minutes before inverting it onto a warm serving platter. Mop up any juices that seep out onto the platter and scatter over basil leaves.

1 Comment

Filed under easy, March

This little piggy went in my oven…

Pork. Not something I cook often. In fact, I can’t remember the last time I cooked it. Maybe a bit of mince in a spag bol or a chop to appease Mr Picky Palette’s demands for a taste of his youth. But here I go – pushing my culinary boundaries.

I confess to being a little bit confronted by the 1.5kg of pork shoulder, on the bone, which I purchased from my local meat man. I was a little bit overwhelmed by that kind of porky smell that pork has (funny that!). Fortunately, the recipe I had chosen to make, Katie Quinn Davies Slow-roasted pork & red wine ragu with pappardelle from the March 2013 issue of delicious. magazine, required very little preparation. A good season with salt and pepper. Pop it on a rack. Underneath, in a roasting tray, place a couple of roughly chopped onions, a whole head of peeled garlic, a cup of water and half a bottle of red wine (preferably shiraz). It then goes into a slow oven (140 degrees celcius) for six hours!

This is a recipe you definately want to get started first thing in the morning if you want to eat your dinner sometime before midnight!

Ready to go into the over for 6 hours

Ready to go into the over for six hours

After four hours of cooking, the recipe asks you to put eight large roma tomatoes onto a separate tray in the oven with the pork. My little oven wouldn’t fit another tray so I just added them to the onions and garlic underneath the pork. No harm done. One less tray to wash up though! Win!

I was surprised by how crispy the outside of the pork got even from being cooked at a very low heat. Not sure if this was supposed to happen. Fortunately, a special friend of mine (hello Leo!) had coincidently cooked this same recipe the day before me, so a quick text to her to find out that she too had ended up with crispy pork. Good.

Crispy skinned pork...

Crispy skinned pork…

When the six hours is up, everything comes out of the oven.

The tomatoes, onion and garlic get blitzed in a food processor along with the basil (which I didn’t have – oops! I replaced it with a handful of parsley.) I admit that basil would have tasted better though. Tomato and basil are meant to be together! This tomatoey mixture then goes into a clean saucepan with two tins of canned tomatoes, a tablespoon of balsamic vinegar, the zest of one lemon, two tablespoons of chopped oregano (from the garden of course!) and the other half of the bottle of wine. It gets simmered for 45 minutes until the sauce is thick.

Once the shoulder of pork is cool enough to handle, shred the meat and discard any skin, fat or bones. I also put aside any meat that was too crispy for a sneaky treat for Mr Picky Palette later. Best wife ever, right?

Pulled pork

Pulled pork

Once the sauce is nice and thick, all the pork goes into the saucepan for a few minutes to heat through.

Red wine ragu ready for the pasta

Red wine ragu ready for the pasta

The recipe called for packet pappardelle. You know me. I made my own pasta using my fool-proof Jamie Oliver basic egg pasta recipe which I’ve shared with you before. There is something about fresh pasta. It just tastes so much better. Do it! Do it! Do it!

Once you’ve cooked the pasta, stir it through the sauce and serve it up with freshly grated parmesan. Delicious!

The finished product

The finished product

But you know the whole time I was shredding the pork all I could think of was crusty bread and creamy coleslaw.

Note to self: next time one decides to spend the whole day with the oven on roasting a shoulder of pork, save some for a sandwich!

X Bree

P.S I lied – I actually have cooked pork before. I just remembered. I roasted a ham last Christmas and the one before that. Obviously not memorable!

slow-roasted pork  & red wine ragu with pappardelle

Serves 6-8

delicious. magazine, (Mar 2013, p. 94)

2 onions, quartered
1 garlic bulb, cloves separated, peeled
1.5kg pork shoulder (bone in)
Olive oil, to drizzle
750ml bottle shiraz
8 large roma tomatoes, halved
1 cup (80g) basil leaves
2 x 400g cans chopped tomatoes
1 tbs balsamic vinegar
1 tbs finely grated lemon rind
2 tbs chopped oregano leaves
600g pappardelle* MAKE YOUR OWN! YOU KNOW YOU WANT TO!
Grated parmesan, to serve

Preheat the oven to 140 degrees celcius.

Scatter the onion and garlic over the base of a large roasting pan. Sit a roasting rack over vegetables and place the pork on the rack. Season well with sea salt and freshly ground pepper, and drizzle liberally with olive oil. Pour half of the wine (375ml) and 1 cup (250ml) of water into the base of the pan, over the onion and garlic.

Slow-roast for 6 hours, checking every hour to make sure that the liquid doesn’t fully evaporate (if necessary, add extra water to the pan). I needed to a couple of times.

Place the tomatoes on a baking tray, then season and drizzle with olive oil. Roast with the pork for the final 2 hours of cooking time.

Remove roasting pan and tomatoes from the oven. Place the tomatoes, onion and garlic cloves in a blender, along with the basil. Whiz until a smooth sauce. Place tomato sauce in a large saucepan, along with canned tomatoes, vinegar, lemon zest, oregano and remaining 375ml wine. Season and simmer over medium-low heat for 45 minutes or until well reduced.

Shred the pork, discarding the skin, fat and bones. Add the meat to the saucepan and cook for a further 15 minutes or until reduced and thick.

Meanwhile, cook pappardelle according to packet instructions. Drain and divide pasta among serving bowls. Ladle pork over pasta and scatter with parmesan before serving.

Leave a comment

Filed under budget friendly, March

Let’s talk about “that” sandwich

Before I can put February behind me, we need to talk about “that” sandwich.

When I began this challenge, one of the ground rules I set myself was that I would cook every cover recipe. I didn’t realise how hard that would be. It meant, no matter how difficult the recipe (e.g. the cake that nearly broke me) or how gross the ingredient (e.g eggplant…erggghh) I had to cook it.

On the last day of February I still had three cover recipes to cook:

  1. Figs with honeyed yoghurt, prosciutto & mint (Feb 2005, p. 14)
  2. Baby bocconcini & roast tomato tart (Feb 2002, p.181)
  3. Fontina cheese & basil toastie (Feb 2007, p. 89) aka “that” sandwich

Why was it that on the last day of February I still had three cover recipes to go? Because I was procrastinating. I was doing everything I could to avoid making a silly little sandwich. And why? Because it involved three ingredients. Anchovies. Sage leaves. Fontina cheese. Wrong! Right?

When I put out a plea on the My Delicious Year Facebook page community for permission to break the ground rules and not make this sandwich, one of my friends from my school days rightly pointed out that no where in the ground rules did it say I had to eat it. Thanks Rebecca. You are right!

So after a busy day of cooking on Thursday (three recipes in one day!) I made “that” sandwich. I had absolutely no confidence in the recipe. Nor did delicious. magazine. In fact the picture on the cover was actually a different recipe to what was printed in the magazine! What the? Skye Gyngell’s original recipe was sage leaves, sourdough bread, fontina cheese and anchovies. delicious. magazine altered the recipe to include basil instead of sage and added fresh slices of tomato. In my eyes, even they doubted the combination of sage, anchovies and fontina.

Of course when I went to the shop I couldn’t find fontina cheese anywhere! Far out… Another reason to try to get out of making the recipe. A quick question to Dr Google on my incredibly smart phone and I found a suitable alternative, Gruyere. No more excuses. Just make the damn sandwich.

The hairy sandwhich assembly

The hairy sandwich assembly

And there it was. A quick assembly of required ingredients. Into my sandwich press. And five minutes later the most revolting toastie in the entire universe was ready.

But, the thing was, it wasn’t revolting! Yes, I took a bite. I did it for the team. I did it so I could honestly report back to you on what it was like. It was only one bite, but in all honesty I could have eaten the lot (except that I couldn’t actually get it back off Mr Picky Palette after I had offered it to him).

I took a bite, I promise...

I took a bite, I promise…

I had convinced myself it would be this fishy, hairy, greasy, revolting sandwich and it wasn’t. Sure it was salty. But I like salty. It was cheesy.  It was crunchy. It was moreish. Where’s the beer?

And now I can sit here honestly and tell you that I cooked and tried all twelve February cover recipes and lived to tell the tale.

But I will never be making that sandwich again.

The end.

X Bree

What food combination would you completely freak out about if you were forced to eat it? Leave a comment for me.

Fontina cheesee & herb toasted sandwiches

Serves 4

delicious. magazine (Feb 2007, p. 88)

To make these sandwiches as per the cover, replace the sage leaves with basil, and add sliced tomato with the anchovies.

14 fresh sage leaves
1/4 cup (60ml) mild-tasting extra-virgin olive oil, plus extra to grease
8 slices chewy peasant-style bread  (preferably sourdough)
125gm fontina cheese*, coarsely grated (I used gruyere)
6 good-quality anchovies in oil, drained

Tear 10 sage leaves. Place in a small saucepan with oil and 1/2 tsp pepper and heat over low heat for 1-2 minutes until just warm to the touch. Turn off the heat and stand while you assemble the sandwiches.

Tear remaining sage leaves. Cover half the bread slices with cheese, taking it all the way to the crust. Chop the anchovies roughly. Sprinkle over the cheese and top with torn sage leaves. Top each with a second slice of bread, then press firmly with the palm of your hand. Brush the sandwiches on both sides with sage oil, making sure you go all the way to the edges. Season with pepper.

Heat a well-seasoned cast-iron or other heavy-based frypan over low heat and sprinkle with a little extra oil. Add the sandwiches, in batches if necessary, and cook for 2-3 minutes on each side until golden and cheese melts. Wrap in napkins and pack in the picnic bag or eat on the way there while the cheese is still soft.

* Fontina is a melting Italian cheese from selected delis and gourmet shops.

2 Comments

Filed under February

Farewell to February

Some of my February favourites

Some of my February favourites

It’s official. I have made it through the first month of the My Delicious Year challenge! Round of applause please?

In the end I managed 31 recipes in 28 days. Not a bad effort for the first month of the challenge. In all honesty though, it has been a whole lot of fun.

Here’s a quick recap on some of my favourite recipes from the month:

Top 3 desserts

Real strawberry jelly (Feb 2011, p. 44)
Vanilla panna cotta with roasted plums – COVER (Feb 2003, p. 10)
Strawberry & almond crumble with crème fraiche (Feb 2004, p. 81)

Top 3 easy weeknight dinners

Minced chicken with Thai basil (Feb 2006, p.76)
Prawn, zucchini & mint tagliatelle (Feb 2011, p. 52)
Honey lemon chicken wings (Feb 2004, p. 104)

Top 3 fancy weekend dinners

Smoked salmon & pea risoni with a coriander mojo (Feb 2007, p. 80)
Ravioli with roasted pumpkin & herbs (Feb 2002, p. 128)
Roasted vegetable strudel with pesto sauce (Jan/Feb 2002, p. 86)

Top 3 cheap and cheerful

Tuna-stuffed capsicum (Feb 2004, p. 74)
Stir-fried pork and pickled cucumber on rice noodles (Feb 2008, p. 96)
Chicken dumplings in broth (Feb 2005, p. 62)

This whole little project has been good for me. I used to be a disorganised cook, often waiting until mid afternoon  before I would start to think about what I would cook for dinner. Now I sit down at the start of the week and plan my meals out for the week and only shop once or twice.

It has also been good for the rest of the family. B2 and B4 are your usual fussy eaters. But they have been really great. Trying lots of new things. Finding new things that they like. Generally being awesome little dudes – except for the one or two times I have had to spoon feed them or threaten to send them to bed without any dinner!

Even Mr Picky Palette has been awesome. He is the first to remind me that I am a quitter or that I never finish what I start. But I have proved him wrong so far. He happily wolf’s down the food I make, offers his two cents on what I should or shouldn’t have put in it, and then asks for seconds. I’m happy with that…

I would really like to thank each and every one of you that are reading my blog, leaving comments and liking what I am doing. That is really what keeps me going each day, knowing that I have your support. If I have inspired just one of you to try something new, then my job is done! Thank you so much! 

Now that March is underway, I can’t wait to get into some delicious Autumn food! I look forward to continue sharing My Delicious Year with you!

Take care,

X Bree

P.S You can find a full list of what I cooked during February here.

1 Comment

Filed under February

I made an ugly cake…

So I made this ugly cake.

Well actually it was a brownie – a chocolate cheesecake brownie.

I should have known better.

You mix together the ingredients for the brownie base and then you mix together the ingredients for the cheesecake.

Two thirds of the brownie mix goes in the bottom of the cake tin, followed by the cheesecake, followed by the last third of the brownie mix. Then you swirl it all around and bake it.

Here's where it starts to get ugly

Here’s where it starts to get ugly

Here’s where it got ugly. There was SO much cheesecake mixture. It involved almost a kilogram of cream cheese after all! My gut told me that it wouldn’t all fit in the 24cm square cake pan suggested. I ignored my gut and just followed the instructions.

So I spent the next hour nervously watching it bake in the oven.

And as I expected, it slowly rose up, up, up and over like warm chocolatey lava. Disaster!

It didn’t help that I was in a hurry too. I had planned on taking the brownie out to my parents house for morning tea, but I was running late. After it broke its banks and oozed up and over that stupid little pan I switched off the oven and left it there. I would deal with whatever was waiting for me when I got home.

When I got home and opened up the oven, the brownie had kind of sunk violently in the middle with some serious chocolate hanging over the baking paper and cake pan.

Cracked, sunken and overflowing - sigh!

Cracked, sunken and overflowing – sigh!

I left the cake to completely cool in the pan and then dragged it out. Things just got uglier…

Every time I tried to cut a nice piece to photograph and share with you lovely people, the cake cracked more, bits fell off, oh it was just a disaster! U-G-L-Y!

But, those little bits that kept falling off the cake kept falling in my mouth and, oh my goodness, they were yum! Chocolatey, gooey, chewy, sweet, cheesy, deliciousness!

In the end I hacked it into square like pieces and sent it off to work with Mr Picky Palette for his co-workers to enjoy. They didn’t seem to mind ugly cake.

Moral of the story:

  1. Go with your gut instincts
  2. Use a bigger cake pan
  3. Or halve the cheesecake mixture
  4. Ugly can still taste delicious

X Bree

At this point I gave up trying to cut a piece pretty enough to share with you...

At this point I gave up trying to cut a piece pretty enough to share with you…

Chocolate cheesecake brownies

Makes 16

delicious. magazine (Feb 2009, p. 101)

250g dark chocolate, roughly chopped
250g unsalted butter, softened
2 cups (440g) caster sugar
4 eggs
3/4 cup (110g) plain flour
750g cream cheese, softened

Preheat the oven to 160 degrees celcius. Grease and line a 24cm square cake pan.

Melt the chocolate in a heatproof bowl set over a saucepan of simmering water (don’t let the bowl touch the water). I melted mine in the microwave – it’s much quicker and uses less dishes!

Meanwhile, place butter and 1 1/4 cups (275g) sugar in a bowl, then beat with electric beaters until thick and pale. Add 2 eggs, one at a time, beating well between each. Add melted chocolate and flour, then continue beating until well combined.

Spread two-thirds of the chocolate mix in the pan. Set remaining mixture aside.

In a separate bowl, beat the cream cheese and remaining 3/4 cup (165g) sugar with electric beaters until smooth. Add the remaining 2 eggs, one at a time, beating well between each addition.

Carefully spread cream cheese mixture over the chocolate in the pan. Dollop the remaining chocolate mixture over cream cheese layer, then use a fork to swirl the chocolate through the cream cheese.

Bake for 1 hour and 15 minutes or until the centre is just set. Cool completely in pan, then carefully remove from the pan, transfer to a board and cut into 16 squares.

4 Comments

Filed under cake, February

Stretching the pennies for a cheap weeknight dinner

I was surprised to receive a bit of backlash during the week about how much money (and time) people assumed I was spending feeding my family on this new “delicious” diet.

The thing is, from Monday through to Friday I am drawn to recipes that are quick and simple to prepare and only require a few ingredients. On the weekends, when I have a bit more time, I like to go all out and try out the more lavish recipes that require more time and more money. The weekend is also the time when I might bake something special for morning tea and try out something a bit extravagant for dessert.

Chicken dumplings in broth

Chicken dumplings in broth

Take for example last week’s Chicken Dumplings in Broth. The list of ingredients were:

250 gm chicken mince
1 garlic clove
1 tbs chopped coriander
1 eggwhite
4 tbs light soy sauce, plus extra to serve
1 L chicken stock
1 lemongrass stem
2.5cm piece ginger
2 small red chillies
2 star anise
2 tbs lime juice
1 tsp sesame oil
1 tbs fish sauce
1 /2 bunch garlic chives (which I didn’t use)
chilli bean sauce, to serve

Out of everything on the list, the only things I didn’t already have  in the fridge or pantry was the chicken mince and lemongrass. A quick check of Coles online and 500g chicken mince is currently $5.90 (and you only need half of that) and one bunch of lemongrass is $2.48. I also threw in a few rice noodles to bulk out the meal which are very cheap at my local Asian store. So really, in order for me to put this meal together for the four us, it cost well under $10.

What i’m trying to say is that it doesn’t cost a lot to feed your family fresh, fancy looking food, if that is your thing. Looks can be very deceiving!

Maybe I have Instagram to thank for making my food look fancier than what it really is…

X Bree

P.S You can find the full recipe here.

Whats your family’s favourite cheap, but a little bit fancy, dinner?

6 Comments

Filed under budget friendly, February, low fat

The cake that nearly broke me

Under normal circumstances I would never attempt a cake like the Summer layer cake, the cover recipe from the February 2012 issue of delicious. magazine. However, you may recall that when I started this little project, one of my “ground rules” was that I would cook every single cover recipe. This whole exercise was designed to push me out of my comfort zone and cook things I would ordinarily deem too hard.

The plan was to make the cake for my birthday, a Wednesday. But the night before, during a quick scan of the recipe to ensure I had all the necessary ingredients, I came across the dreaded words “Begin this recipe a day ahead”. I was not off to a particularly good start. There would be no birthday cake.

As it turns out, I got busy and I didn’t end up starting the cake until Friday.

The first stage was making the cake and berry mousse which would be sandwiched between each layer of cake. This stage was pretty straight forward, except that I don’t own two springform pans. And the one I borrowed from my mother was a different size to mine. This is kind of critical when you are making a multi layered cake that would set overnight in said pan. In the end I made do using three pans almost the same size and hoped for the best.

Having had a terrible incident with smoke and electricity (and a trip to the bin) with my own mixer late last year, I borrowed my mother’s beautiful vintage Sunbeam mixer. I would say it is over 40 years old, but it is still working as new. They certainly don’t make them like they used to.

My mother's vintage Sunbeam mixer

My mother’s vintage Sunbeam mixer

The cake is the usual cream butter and sugar blah blah. No drama there.

While the cake was baking I got on to making the berry mousse. It’s quite a simple process of mixing together strawberries, raspberries, cream and gelatine. The trick is to gently fold the whipped cream into the berry puree and keep the mixture light. This was so good. I could actually have eaten it on its own. No volunteers required for bowl licking here!

What came next was a whole lot of cutting, trimming, glad wrapping and finger crossing. I had to cut one cake in half and slice the top off the other two to make them all about the same size. I glad wrapped the cake pan I baked one of the cakes in and then put the first layer of cake into the bottom, topped it with a third of the berry mousse mixture and repeated to make four layers of cake and three layers of mousse. It was then sealed with more glad wrap and tucked up into bed in the fridge over night.

The next afternoon I finally got the courage to finish the cake off. In my eyes this was the hard part – making the marshmallow icing and assembly.

I have never come across a marshmallow icing recipe before, but this is a revelation. Since I made it I have been trying to come up with other uses for it (I’m thinking cup cakes!!!). It is a bit of a process to make it, but well worth it. Over a double boiler on the stove you whisk the egg white, sugar and cream of tartar until the mixture kind of doubles in size and becomes frothy. You then add the chopped up marshmallows and transfer it over to your mixer and beat it at top speed for about ten minutes until it becomes thick, pale, shiny, cool and DELICIOUS!!!

Stage 1Stage 2Stage 3

As for the final stage of assembly, well, um, it tasted good!

I wasn’t thrilled with how it looked in the end. It wasn’t anywhere near as pretty as the original in the delicious. magazine.

I think each of the layers were quite even, I was happy with that. I found that I had to work pretty quickly to get the marshmallow icing on as I noticed it starting to slide off the cake. I also failed to get the dessicated coconut onto the sides of the cake. Not sure how they managed that one…

Before the marshmallow icing

Before the marshmallow icing

The end result

So four days after originally planning to be eating cake, we finally sat down and tried it.

The cut

The cut

My piece!

My piece!

It may not have been that pretty. It may have taken two days. I may have had to adapt the recipe a little to fit in with the equipment I had. But I did it! It didn’t break me! But it was hard work!

I’ll leave it up to B2 to sum up for you how the cake actually tasted. A picture tells a thousand words…

Finger licking good

Finger licking good

X Bree

6 Comments

Filed under cake, February, ground rules, special occasion

Pasta and Panna Cotta – A fancy Sunday night dinner

In our house Sunday night dinners are not flash. They usually consist of scrambled eggs or fridge leftovers. But since I embarked on this cooking extravaganza Sunday nights dinner have been a bit more fancy.

Tonight we took a trip back to 2002 and 2003 and enjoyed Ravioli with roasted pumpkin & herbs and Panna cotta with roasted plums. One word = yum!

I have made fresh pasta before, and in fact, the recipe calls for fresh, shop bought lasagne sheets a la Latina style. But I chose to make my own using my faithful Jamie Oliver basic pasta dough recipe. It’s a simple recipe – 100gm of strong “00” flour to each egg. Make as little or as much as you like. I use my food processor so it is whizzed together in a moment. I make enough for six so I can freeze half. Once you’ve made it a few times it is simple. The hardest part really is the rolling out and getting the texture smooth and silky.

Rolling out the fresh egg pasta

Rolling out the fresh egg pasta

The filling for the ravioli is a simple mix of roasted butternut pumpkin, ricotta, egg yolk, parmesan, toasted pine nuts, fresh herbs (I used sage, basil and thyme) and a pinch of nutmeg (which I forgot – whoops!). I’m not a fan of butternut pumpkin. I find it kind of stringy. I prefer the blue or jap and would probably use that next time. Any herbs will do. Whatever you like to eat. Fresh from your own garden is even better!

The ravioli filling

The ravioli filling

Next is the most difficult part – rolling and filling the ravioli. The secret is not to overfill the ravioli and to make sure that you get all of the air out before you seal each one. I made little round ones because that is the only cutter I had, but you could also cut them by hand into squares or use a fancy crimper cutter. Whatever…

Even little mounds are best

Even little mounds are best

Perfect little packages

Perfect little packages

While you are boiling your ravioli in salted water (4 or 5 minutes until they rise to the surface) you can make the sage flavoured oil by warming your extra virgin olive oil and dropping in a dozen sage leaves till they sizzle and crisp up.

The result is perfect little pillows with a sweet and savoury pumpkin and cheese filling. Really delicious. Give it a go!

The end result

The end result

Now for the panna cotta. Confession! This recipe is SO easy I actually whipped it up 15 minutes before I went to bed on Saturday night. I’m not sure why I thought it would be more difficult. Maybe it’s Masterchef’s fault. Or Matt Preston. You’ve got to get your “wobble” right. Miraculously, I did.

This recipe is NOT low-fat. It consists of cream, cream, vanilla, sugar and more cream. It is very rich, very sweet and very much a sometimes food! But so, so good.  You simply heat the two types of cream, vanilla bean and sugar in a pot and bring it to a simmer and switch it off. Let it cool for a few minutes then add your softened leaf gelatine. Strain it and pour it into little dariole moulds, or if you don’t have them, just pour it into whatever you want to serve it in. Leave them in the fridge over night to set. The recipe said it would make six. I made eight. Any bigger and I think I would have had a sugar convulsion (did I mention this recipe is rich?)

While I was cooking dinner last night I made the roasted plums, which is pretty much that. Plums, sugar, more vanilla bean roasted in a hot oven for about 20 minutes.

The trickiest part of this recipe is getting the panna cotta out of the dariole moulds. The easiest way I found was to run a knife around the edge of the mould to break the seal, dip the mould into warm water for a minute, turn it upside down onto the plate you want to serve it on and give it a little bang. Ta da! Magic! All the little seeds from the vanilla bean have now settled on top of your panna cotta which makes it look pretty. Add a couple of plums and you have a very good-looking dessert.

Vanilla panna cotta with roasted plums

Vanilla panna cotta with roasted plums

These two recipes were published in delicious. magazine more than ten years ago, yet they have not dated a bit. If you want to impress somebody, without going to a whole lot of trouble, you must give them both a go.

However, after such a decadent dinner last night we are one fruit and salad today! Until dinner of course, where I am planning on using the rest of my fresh egg pasta to make another delicious dinner!

X Bree

5 Comments

Filed under February, special occasion