Category Archives: February

Let’s talk about “that” sandwich

Before I can put February behind me, we need to talk about “that” sandwich.

When I began this challenge, one of the ground rules I set myself was that I would cook every cover recipe. I didn’t realise how hard that would be. It meant, no matter how difficult the recipe (e.g. the cake that nearly broke me) or how gross the ingredient (e.g eggplant…erggghh) I had to cook it.

On the last day of February I still had three cover recipes to cook:

  1. Figs with honeyed yoghurt, prosciutto & mint (Feb 2005, p. 14)
  2. Baby bocconcini & roast tomato tart (Feb 2002, p.181)
  3. Fontina cheese & basil toastie (Feb 2007, p. 89) aka “that” sandwich

Why was it that on the last day of February I still had three cover recipes to go? Because I was procrastinating. I was doing everything I could to avoid making a silly little sandwich. And why? Because it involved three ingredients. Anchovies. Sage leaves. Fontina cheese. Wrong! Right?

When I put out a plea on the My Delicious Year Facebook page community for permission to break the ground rules and not make this sandwich, one of my friends from my school days rightly pointed out that no where in the ground rules did it say I had to eat it. Thanks Rebecca. You are right!

So after a busy day of cooking on Thursday (three recipes in one day!) I made “that” sandwich. I had absolutely no confidence in the recipe. Nor did delicious. magazine. In fact the picture on the cover was actually a different recipe to what was printed in the magazine! What the? Skye Gyngell’s original recipe was sage leaves, sourdough bread, fontina cheese and anchovies. delicious. magazine altered the recipe to include basil instead of sage and added fresh slices of tomato. In my eyes, even they doubted the combination of sage, anchovies and fontina.

Of course when I went to the shop I couldn’t find fontina cheese anywhere! Far out… Another reason to try to get out of making the recipe. A quick question to Dr Google on my incredibly smart phone and I found a suitable alternative, Gruyere. No more excuses. Just make the damn sandwich.

The hairy sandwhich assembly

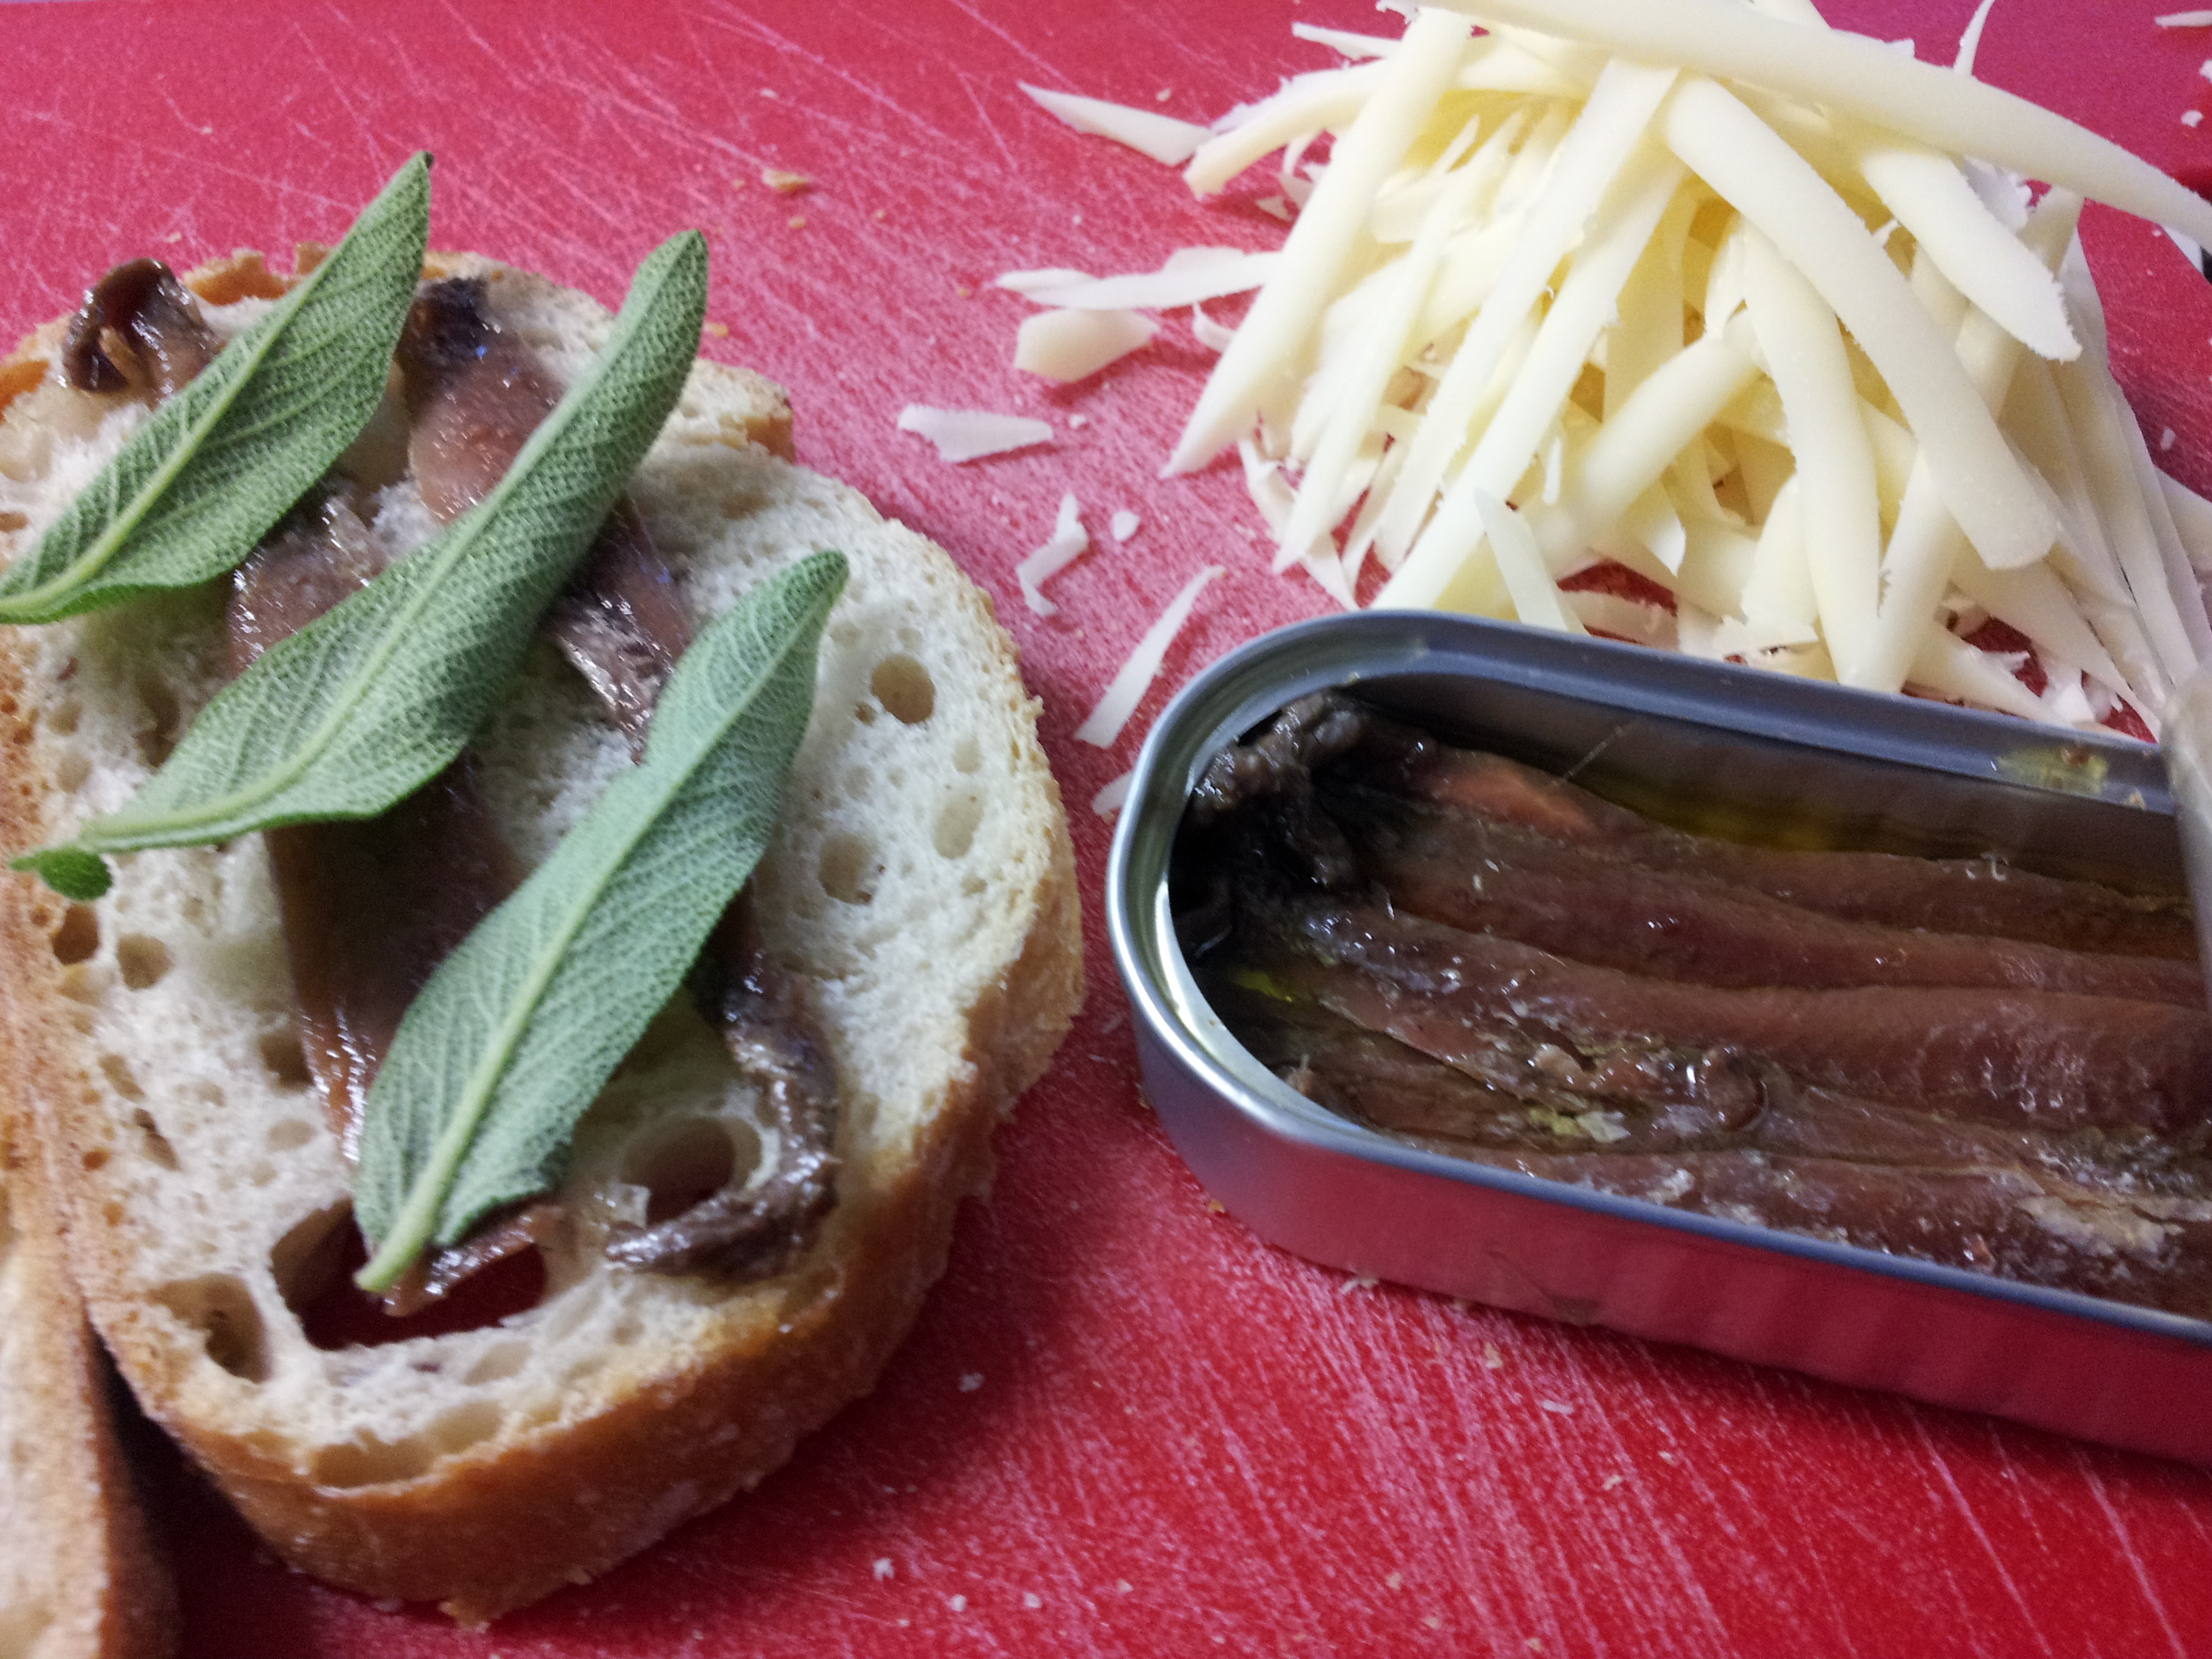
The hairy sandwich assembly

And there it was. A quick assembly of required ingredients. Into my sandwich press. And five minutes later the most revolting toastie in the entire universe was ready.

But, the thing was, it wasn’t revolting! Yes, I took a bite. I did it for the team. I did it so I could honestly report back to you on what it was like. It was only one bite, but in all honesty I could have eaten the lot (except that I couldn’t actually get it back off Mr Picky Palette after I had offered it to him).

I took a bite, I promise...

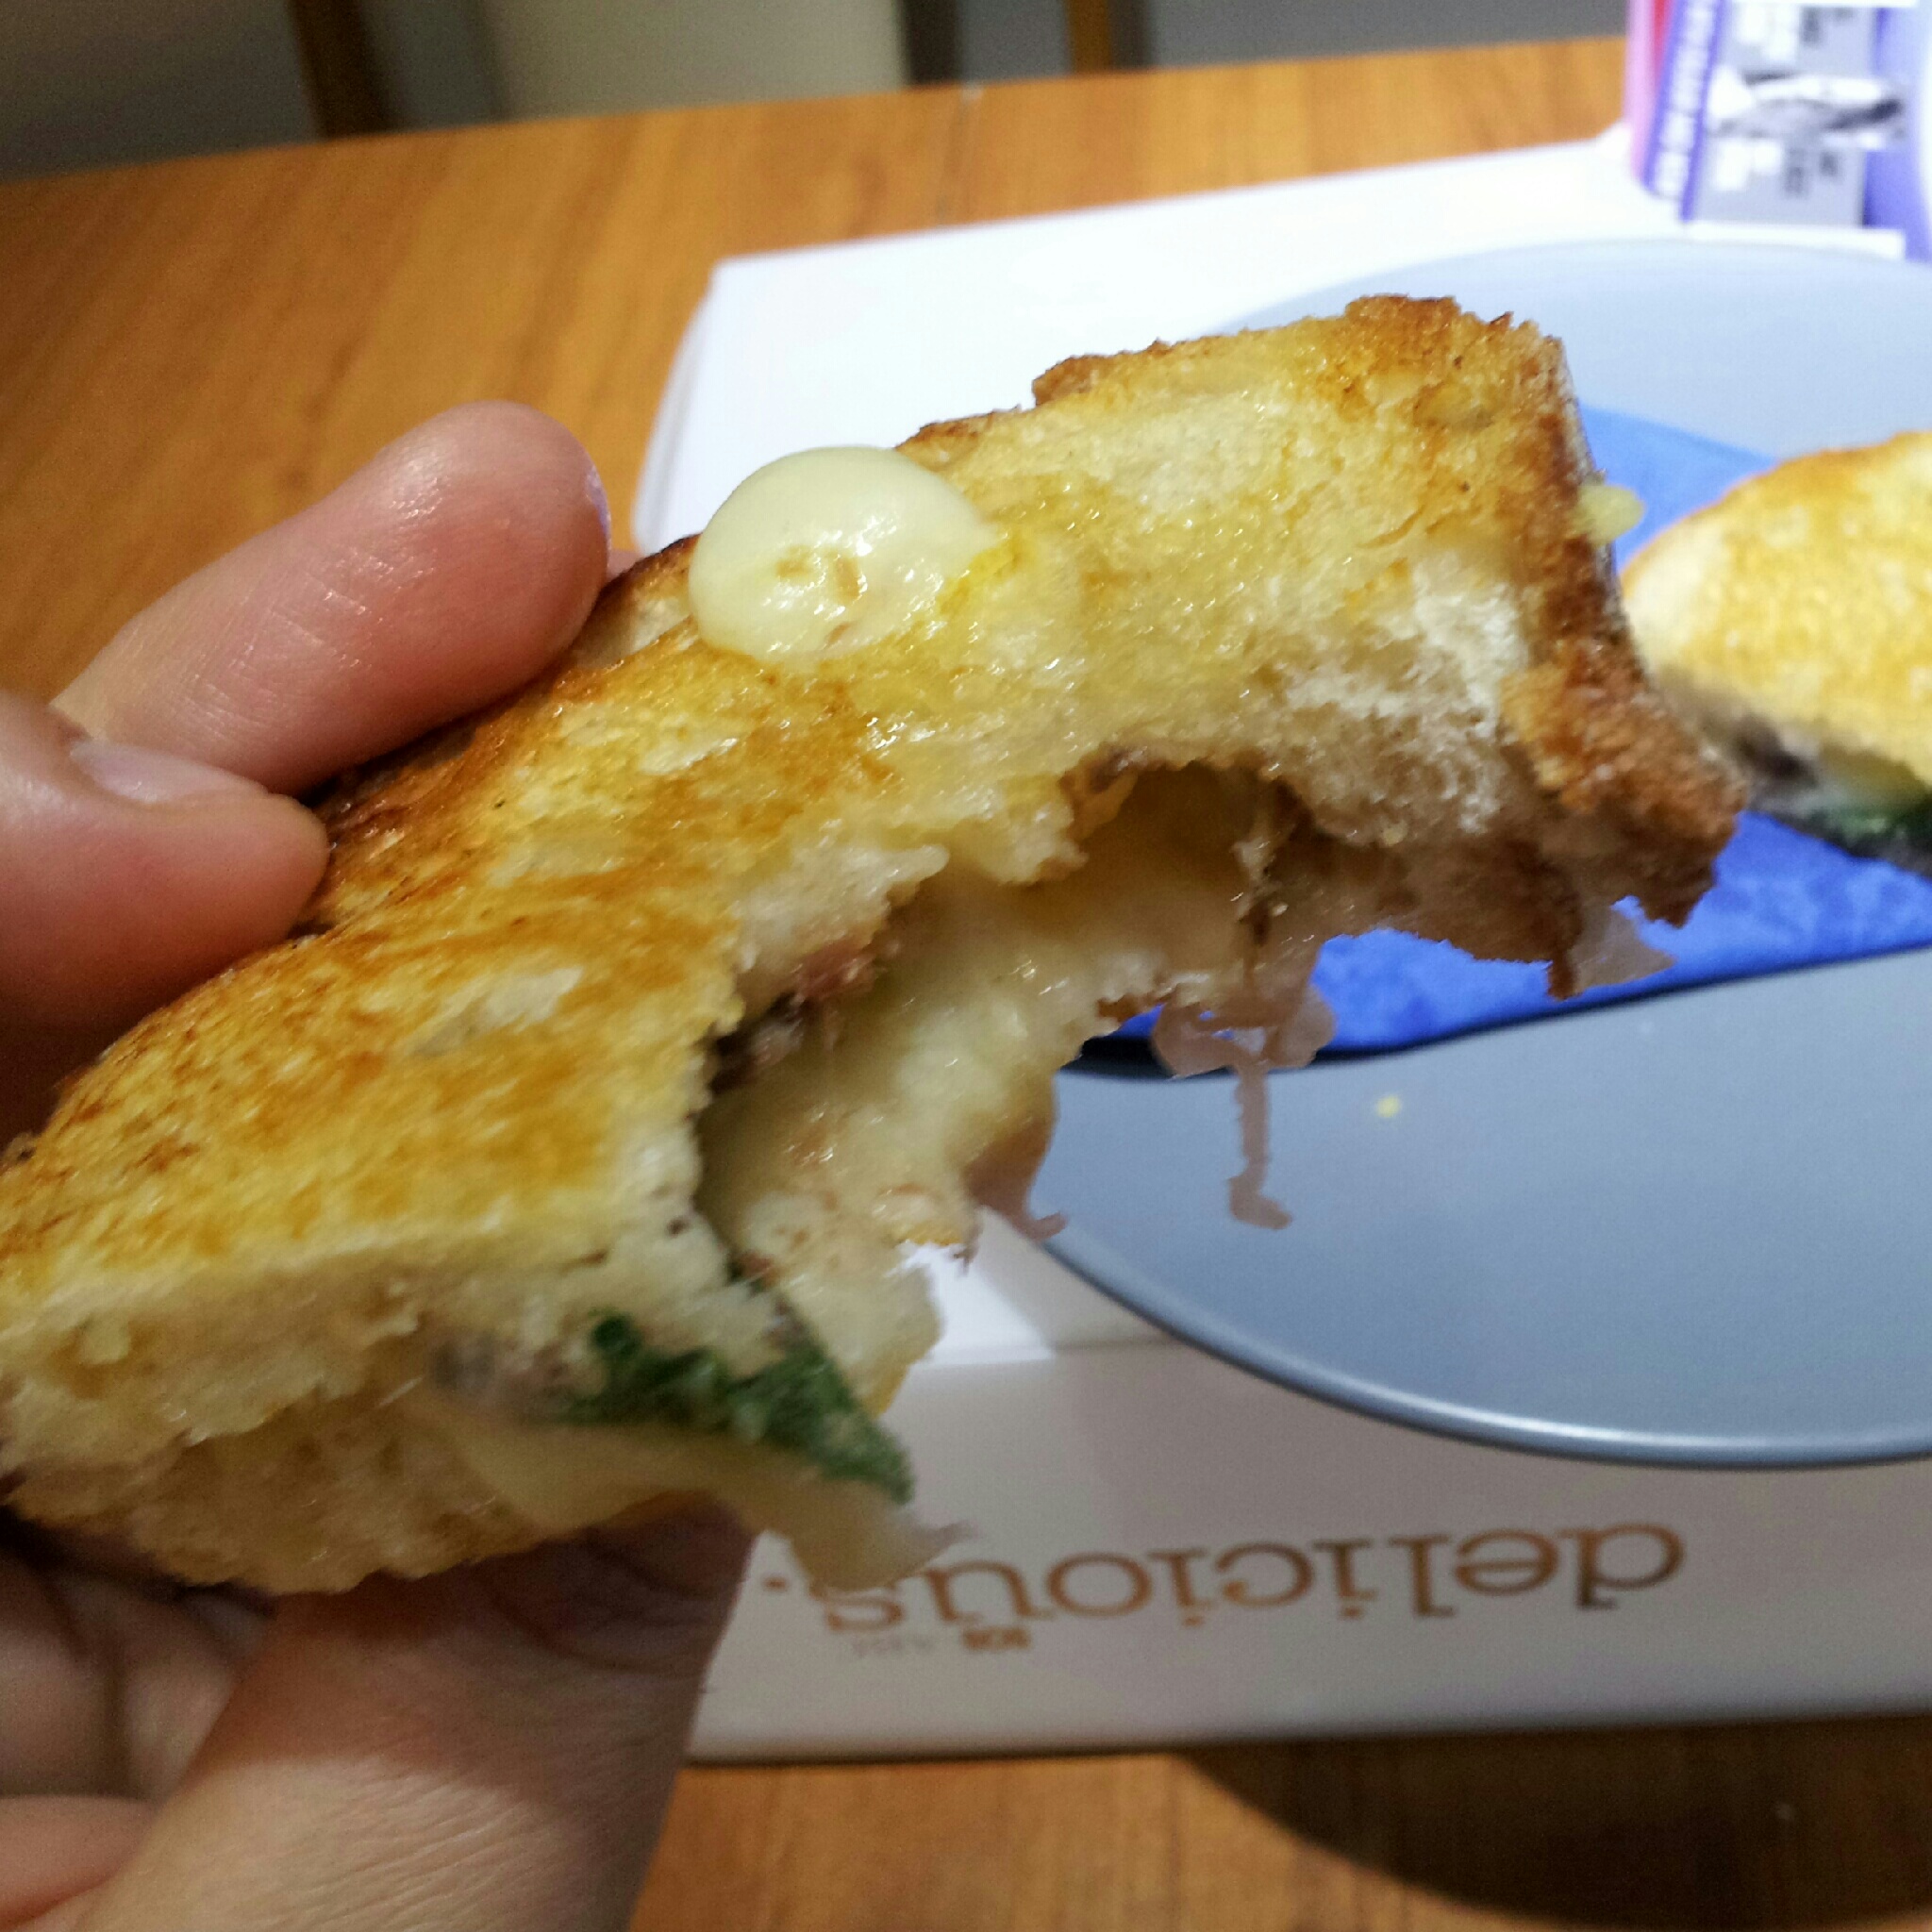
I took a bite, I promise…

I had convinced myself it would be this fishy, hairy, greasy, revolting sandwich and it wasn’t. Sure it was salty. But I like salty. It was cheesy.  It was crunchy. It was moreish. Where’s the beer?

And now I can sit here honestly and tell you that I cooked and tried all twelve February cover recipes and lived to tell the tale.

But I will never be making that sandwich again.

The end.

X Bree

What food combination would you completely freak out about if you were forced to eat it? Leave a comment for me.

Fontina cheesee & herb toasted sandwiches

Serves 4

delicious. magazine (Feb 2007, p. 88)

To make these sandwiches as per the cover, replace the sage leaves with basil, and add sliced tomato with the anchovies.

14 fresh sage leaves
1/4 cup (60ml) mild-tasting extra-virgin olive oil, plus extra to grease
8 slices chewy peasant-style bread  (preferably sourdough)
125gm fontina cheese*, coarsely grated (I used gruyere)
6 good-quality anchovies in oil, drained

Tear 10 sage leaves. Place in a small saucepan with oil and 1/2 tsp pepper and heat over low heat for 1-2 minutes until just warm to the touch. Turn off the heat and stand while you assemble the sandwiches.

Tear remaining sage leaves. Cover half the bread slices with cheese, taking it all the way to the crust. Chop the anchovies roughly. Sprinkle over the cheese and top with torn sage leaves. Top each with a second slice of bread, then press firmly with the palm of your hand. Brush the sandwiches on both sides with sage oil, making sure you go all the way to the edges. Season with pepper.

Heat a well-seasoned cast-iron or other heavy-based frypan over low heat and sprinkle with a little extra oil. Add the sandwiches, in batches if necessary, and cook for 2-3 minutes on each side until golden and cheese melts. Wrap in napkins and pack in the picnic bag or eat on the way there while the cheese is still soft.

* Fontina is a melting Italian cheese from selected delis and gourmet shops.

2 Comments

Filed under February

Farewell to February

Some of my February favourites

Some of my February favourites

It’s official. I have made it through the first month of the My Delicious Year challenge! Round of applause please?

In the end I managed 31 recipes in 28 days. Not a bad effort for the first month of the challenge. In all honesty though, it has been a whole lot of fun.

Here’s a quick recap on some of my favourite recipes from the month:

Top 3 desserts

Real strawberry jelly (Feb 2011, p. 44)
Vanilla panna cotta with roasted plums – COVER (Feb 2003, p. 10)
Strawberry & almond crumble with crème fraiche (Feb 2004, p. 81)

Top 3 easy weeknight dinners

Minced chicken with Thai basil (Feb 2006, p.76)
Prawn, zucchini & mint tagliatelle (Feb 2011, p. 52)
Honey lemon chicken wings (Feb 2004, p. 104)

Top 3 fancy weekend dinners

Smoked salmon & pea risoni with a coriander mojo (Feb 2007, p. 80)
Ravioli with roasted pumpkin & herbs (Feb 2002, p. 128)
Roasted vegetable strudel with pesto sauce (Jan/Feb 2002, p. 86)

Top 3 cheap and cheerful

Tuna-stuffed capsicum (Feb 2004, p. 74)
Stir-fried pork and pickled cucumber on rice noodles (Feb 2008, p. 96)
Chicken dumplings in broth (Feb 2005, p. 62)

This whole little project has been good for me. I used to be a disorganised cook, often waiting until mid afternoon  before I would start to think about what I would cook for dinner. Now I sit down at the start of the week and plan my meals out for the week and only shop once or twice.

It has also been good for the rest of the family. B2 and B4 are your usual fussy eaters. But they have been really great. Trying lots of new things. Finding new things that they like. Generally being awesome little dudes – except for the one or two times I have had to spoon feed them or threaten to send them to bed without any dinner!

Even Mr Picky Palette has been awesome. He is the first to remind me that I am a quitter or that I never finish what I start. But I have proved him wrong so far. He happily wolf’s down the food I make, offers his two cents on what I should or shouldn’t have put in it, and then asks for seconds. I’m happy with that…

I would really like to thank each and every one of you that are reading my blog, leaving comments and liking what I am doing. That is really what keeps me going each day, knowing that I have your support. If I have inspired just one of you to try something new, then my job is done! Thank you so much! 

Now that March is underway, I can’t wait to get into some delicious Autumn food! I look forward to continue sharing My Delicious Year with you!

Take care,

X Bree

P.S You can find a full list of what I cooked during February here.

1 Comment

Filed under February

I made an ugly cake…

So I made this ugly cake.

Well actually it was a brownie – a chocolate cheesecake brownie.

I should have known better.

You mix together the ingredients for the brownie base and then you mix together the ingredients for the cheesecake.

Two thirds of the brownie mix goes in the bottom of the cake tin, followed by the cheesecake, followed by the last third of the brownie mix. Then you swirl it all around and bake it.

Here's where it starts to get ugly

Here’s where it starts to get ugly

Here’s where it got ugly. There was SO much cheesecake mixture. It involved almost a kilogram of cream cheese after all! My gut told me that it wouldn’t all fit in the 24cm square cake pan suggested. I ignored my gut and just followed the instructions.

So I spent the next hour nervously watching it bake in the oven.

And as I expected, it slowly rose up, up, up and over like warm chocolatey lava. Disaster!

It didn’t help that I was in a hurry too. I had planned on taking the brownie out to my parents house for morning tea, but I was running late. After it broke its banks and oozed up and over that stupid little pan I switched off the oven and left it there. I would deal with whatever was waiting for me when I got home.

When I got home and opened up the oven, the brownie had kind of sunk violently in the middle with some serious chocolate hanging over the baking paper and cake pan.

Cracked, sunken and overflowing - sigh!

Cracked, sunken and overflowing – sigh!

I left the cake to completely cool in the pan and then dragged it out. Things just got uglier…

Every time I tried to cut a nice piece to photograph and share with you lovely people, the cake cracked more, bits fell off, oh it was just a disaster! U-G-L-Y!

But, those little bits that kept falling off the cake kept falling in my mouth and, oh my goodness, they were yum! Chocolatey, gooey, chewy, sweet, cheesy, deliciousness!

In the end I hacked it into square like pieces and sent it off to work with Mr Picky Palette for his co-workers to enjoy. They didn’t seem to mind ugly cake.

Moral of the story:

  1. Go with your gut instincts
  2. Use a bigger cake pan
  3. Or halve the cheesecake mixture
  4. Ugly can still taste delicious

X Bree

At this point I gave up trying to cut a piece pretty enough to share with you...

At this point I gave up trying to cut a piece pretty enough to share with you…

Chocolate cheesecake brownies

Makes 16

delicious. magazine (Feb 2009, p. 101)

250g dark chocolate, roughly chopped
250g unsalted butter, softened
2 cups (440g) caster sugar
4 eggs
3/4 cup (110g) plain flour
750g cream cheese, softened

Preheat the oven to 160 degrees celcius. Grease and line a 24cm square cake pan.

Melt the chocolate in a heatproof bowl set over a saucepan of simmering water (don’t let the bowl touch the water). I melted mine in the microwave – it’s much quicker and uses less dishes!

Meanwhile, place butter and 1 1/4 cups (275g) sugar in a bowl, then beat with electric beaters until thick and pale. Add 2 eggs, one at a time, beating well between each. Add melted chocolate and flour, then continue beating until well combined.

Spread two-thirds of the chocolate mix in the pan. Set remaining mixture aside.

In a separate bowl, beat the cream cheese and remaining 3/4 cup (165g) sugar with electric beaters until smooth. Add the remaining 2 eggs, one at a time, beating well between each addition.

Carefully spread cream cheese mixture over the chocolate in the pan. Dollop the remaining chocolate mixture over cream cheese layer, then use a fork to swirl the chocolate through the cream cheese.

Bake for 1 hour and 15 minutes or until the centre is just set. Cool completely in pan, then carefully remove from the pan, transfer to a board and cut into 16 squares.

4 Comments

Filed under cake, February

Stretching the pennies for a cheap weeknight dinner

I was surprised to receive a bit of backlash during the week about how much money (and time) people assumed I was spending feeding my family on this new “delicious” diet.

The thing is, from Monday through to Friday I am drawn to recipes that are quick and simple to prepare and only require a few ingredients. On the weekends, when I have a bit more time, I like to go all out and try out the more lavish recipes that require more time and more money. The weekend is also the time when I might bake something special for morning tea and try out something a bit extravagant for dessert.

Chicken dumplings in broth

Chicken dumplings in broth

Take for example last week’s Chicken Dumplings in Broth. The list of ingredients were:

250 gm chicken mince
1 garlic clove
1 tbs chopped coriander
1 eggwhite
4 tbs light soy sauce, plus extra to serve
1 L chicken stock
1 lemongrass stem
2.5cm piece ginger
2 small red chillies
2 star anise
2 tbs lime juice
1 tsp sesame oil
1 tbs fish sauce
1 /2 bunch garlic chives (which I didn’t use)
chilli bean sauce, to serve

Out of everything on the list, the only things I didn’t already have  in the fridge or pantry was the chicken mince and lemongrass. A quick check of Coles online and 500g chicken mince is currently $5.90 (and you only need half of that) and one bunch of lemongrass is $2.48. I also threw in a few rice noodles to bulk out the meal which are very cheap at my local Asian store. So really, in order for me to put this meal together for the four us, it cost well under $10.

What i’m trying to say is that it doesn’t cost a lot to feed your family fresh, fancy looking food, if that is your thing. Looks can be very deceiving!

Maybe I have Instagram to thank for making my food look fancier than what it really is…

X Bree

P.S You can find the full recipe here.

Whats your family’s favourite cheap, but a little bit fancy, dinner?

6 Comments

Filed under budget friendly, February, low fat

The cake that nearly broke me

Under normal circumstances I would never attempt a cake like the Summer layer cake, the cover recipe from the February 2012 issue of delicious. magazine. However, you may recall that when I started this little project, one of my “ground rules” was that I would cook every single cover recipe. This whole exercise was designed to push me out of my comfort zone and cook things I would ordinarily deem too hard.

The plan was to make the cake for my birthday, a Wednesday. But the night before, during a quick scan of the recipe to ensure I had all the necessary ingredients, I came across the dreaded words “Begin this recipe a day ahead”. I was not off to a particularly good start. There would be no birthday cake.

As it turns out, I got busy and I didn’t end up starting the cake until Friday.

The first stage was making the cake and berry mousse which would be sandwiched between each layer of cake. This stage was pretty straight forward, except that I don’t own two springform pans. And the one I borrowed from my mother was a different size to mine. This is kind of critical when you are making a multi layered cake that would set overnight in said pan. In the end I made do using three pans almost the same size and hoped for the best.

Having had a terrible incident with smoke and electricity (and a trip to the bin) with my own mixer late last year, I borrowed my mother’s beautiful vintage Sunbeam mixer. I would say it is over 40 years old, but it is still working as new. They certainly don’t make them like they used to.

My mother's vintage Sunbeam mixer

My mother’s vintage Sunbeam mixer

The cake is the usual cream butter and sugar blah blah. No drama there.

While the cake was baking I got on to making the berry mousse. It’s quite a simple process of mixing together strawberries, raspberries, cream and gelatine. The trick is to gently fold the whipped cream into the berry puree and keep the mixture light. This was so good. I could actually have eaten it on its own. No volunteers required for bowl licking here!

What came next was a whole lot of cutting, trimming, glad wrapping and finger crossing. I had to cut one cake in half and slice the top off the other two to make them all about the same size. I glad wrapped the cake pan I baked one of the cakes in and then put the first layer of cake into the bottom, topped it with a third of the berry mousse mixture and repeated to make four layers of cake and three layers of mousse. It was then sealed with more glad wrap and tucked up into bed in the fridge over night.

The next afternoon I finally got the courage to finish the cake off. In my eyes this was the hard part – making the marshmallow icing and assembly.

I have never come across a marshmallow icing recipe before, but this is a revelation. Since I made it I have been trying to come up with other uses for it (I’m thinking cup cakes!!!). It is a bit of a process to make it, but well worth it. Over a double boiler on the stove you whisk the egg white, sugar and cream of tartar until the mixture kind of doubles in size and becomes frothy. You then add the chopped up marshmallows and transfer it over to your mixer and beat it at top speed for about ten minutes until it becomes thick, pale, shiny, cool and DELICIOUS!!!

Stage 1Stage 2Stage 3

As for the final stage of assembly, well, um, it tasted good!

I wasn’t thrilled with how it looked in the end. It wasn’t anywhere near as pretty as the original in the delicious. magazine.

I think each of the layers were quite even, I was happy with that. I found that I had to work pretty quickly to get the marshmallow icing on as I noticed it starting to slide off the cake. I also failed to get the dessicated coconut onto the sides of the cake. Not sure how they managed that one…

Before the marshmallow icing

Before the marshmallow icing

The end result

So four days after originally planning to be eating cake, we finally sat down and tried it.

The cut

The cut

My piece!

My piece!

It may not have been that pretty. It may have taken two days. I may have had to adapt the recipe a little to fit in with the equipment I had. But I did it! It didn’t break me! But it was hard work!

I’ll leave it up to B2 to sum up for you how the cake actually tasted. A picture tells a thousand words…

Finger licking good

Finger licking good

X Bree

6 Comments

Filed under cake, February, ground rules, special occasion

Pasta and Panna Cotta – A fancy Sunday night dinner

In our house Sunday night dinners are not flash. They usually consist of scrambled eggs or fridge leftovers. But since I embarked on this cooking extravaganza Sunday nights dinner have been a bit more fancy.

Tonight we took a trip back to 2002 and 2003 and enjoyed Ravioli with roasted pumpkin & herbs and Panna cotta with roasted plums. One word = yum!

I have made fresh pasta before, and in fact, the recipe calls for fresh, shop bought lasagne sheets a la Latina style. But I chose to make my own using my faithful Jamie Oliver basic pasta dough recipe. It’s a simple recipe – 100gm of strong “00” flour to each egg. Make as little or as much as you like. I use my food processor so it is whizzed together in a moment. I make enough for six so I can freeze half. Once you’ve made it a few times it is simple. The hardest part really is the rolling out and getting the texture smooth and silky.

Rolling out the fresh egg pasta

Rolling out the fresh egg pasta

The filling for the ravioli is a simple mix of roasted butternut pumpkin, ricotta, egg yolk, parmesan, toasted pine nuts, fresh herbs (I used sage, basil and thyme) and a pinch of nutmeg (which I forgot – whoops!). I’m not a fan of butternut pumpkin. I find it kind of stringy. I prefer the blue or jap and would probably use that next time. Any herbs will do. Whatever you like to eat. Fresh from your own garden is even better!

The ravioli filling

The ravioli filling

Next is the most difficult part – rolling and filling the ravioli. The secret is not to overfill the ravioli and to make sure that you get all of the air out before you seal each one. I made little round ones because that is the only cutter I had, but you could also cut them by hand into squares or use a fancy crimper cutter. Whatever…

Even little mounds are best

Even little mounds are best

Perfect little packages

Perfect little packages

While you are boiling your ravioli in salted water (4 or 5 minutes until they rise to the surface) you can make the sage flavoured oil by warming your extra virgin olive oil and dropping in a dozen sage leaves till they sizzle and crisp up.

The result is perfect little pillows with a sweet and savoury pumpkin and cheese filling. Really delicious. Give it a go!

The end result

The end result

Now for the panna cotta. Confession! This recipe is SO easy I actually whipped it up 15 minutes before I went to bed on Saturday night. I’m not sure why I thought it would be more difficult. Maybe it’s Masterchef’s fault. Or Matt Preston. You’ve got to get your “wobble” right. Miraculously, I did.

This recipe is NOT low-fat. It consists of cream, cream, vanilla, sugar and more cream. It is very rich, very sweet and very much a sometimes food! But so, so good.  You simply heat the two types of cream, vanilla bean and sugar in a pot and bring it to a simmer and switch it off. Let it cool for a few minutes then add your softened leaf gelatine. Strain it and pour it into little dariole moulds, or if you don’t have them, just pour it into whatever you want to serve it in. Leave them in the fridge over night to set. The recipe said it would make six. I made eight. Any bigger and I think I would have had a sugar convulsion (did I mention this recipe is rich?)

While I was cooking dinner last night I made the roasted plums, which is pretty much that. Plums, sugar, more vanilla bean roasted in a hot oven for about 20 minutes.

The trickiest part of this recipe is getting the panna cotta out of the dariole moulds. The easiest way I found was to run a knife around the edge of the mould to break the seal, dip the mould into warm water for a minute, turn it upside down onto the plate you want to serve it on and give it a little bang. Ta da! Magic! All the little seeds from the vanilla bean have now settled on top of your panna cotta which makes it look pretty. Add a couple of plums and you have a very good-looking dessert.

Vanilla panna cotta with roasted plums

Vanilla panna cotta with roasted plums

These two recipes were published in delicious. magazine more than ten years ago, yet they have not dated a bit. If you want to impress somebody, without going to a whole lot of trouble, you must give them both a go.

However, after such a decadent dinner last night we are one fruit and salad today! Until dinner of course, where I am planning on using the rest of my fresh egg pasta to make another delicious dinner!

X Bree

5 Comments

Filed under February, special occasion

Dinner for the kids

February 13 is all about me! T’hat’s right, it’s my birthday! You’d think i’d get the day off cooking, but alas, no.

Mr Picky Palette kindly offered to take me out to a place for grown ups (yay!) while B2 and B4 are left supervised by their Aunty Beck.

But before the grown up fun can commence, I made dinner and dessert for my three lovelies. Thinking something quick and kid friendly I opted for Bill Granger’s honey lemon chicken wings from February 2004 and for a special treat Real strawberry jelly from February 2011.

Chicken legs are very popular in my house. Actually, any food that does not require a knife and fork is pretty popular in my house. Knowing this, I swapped wings for legs and went ahead with making up the honey lemon marinade. Chicken legs go in the oven in their nakedness with a good sprinkle of salt  for 30 minutes at 200 degrees celsius. Then you whip them out. Pour over the marinade, swirl them round and throw them back in the oven for another 20 minutes. During the last 20 minutes I checked on them every 10 minutes and turned them over in the marinade to ensure an even coating of sticky, sweet, savoury, lemon yumminess! The legs do take longer than wings to cook so you just need to keep an eye on them. I cooked them an extra ten minutes, then they were ready to devour. Finger licking goodness!

Honey lemon chicken legs

Honey lemon chicken legs

Honey lemon chicken wings

delicious. magazine Feb 2004: Issue 24, p 104

Serves 8

16 free-range chicken wings, tips removed, jointed (or 6 – 8 legs, I used organic)

1 tbs olive oil

1/2 cup (125ml) lemon juice

3 garlic cloves, crushed

3 tbs (1/4 cup) honey

2 tbs chopped flat-leaf parsley leaves

Lemon wedges, to serve

Preheat oven to 200 degrees celsius.

Place chicken in a large baking dish. Toss with oil, season with salt and roast for 30 minutes

Place lemon juice, garlic and honey in a bowl and stir to combine. Pour over chicken and stir to coat well. Cook for another 20 minutes or until tinged golden and cooked through. Garnish with parsley and serve with lemon.

– – –

Up next, jelly. Not just any jelly. Real. Strawberry. Jelly! Jelly where you know exactly what made it go that glorious pink colour. Jelly with only five ingredients, none of which are scary little numbers. Real. Strawberry. Jelly!

Until now, I didn’t realise how simple it was to make jelly. Why hadn’t I done this before? Why on earth, had I given my children green jelly from a packet, that 20 minutes later made them a little crazy? Never again…

This recipe is so versatile. Swap the strawberries for any seasonal fruit. Or any juice in fact. It is after all the juice or flavour of the fruit that you combine with a simple sugar syrup and gelatine that ends up as your jelly. I can’t wait to experiment with my juicer and make apple jelly or carrot jelly or pineapple jelly! My only criticism of this recipe is that it is super sweet (probably why the kids loved it!). The strawberries have a natural sweetness to them when they are really ripe so next time I would definately halve the amount of sugar I used and just double-check the gelatine packet to make sure that my liquid levels match up with the amount of gelatine required (the recipe calls for 3 tsp).

The method for the jelly is lengthy, but is not a true representation of how quickly you can pull this together. Don’t be put off by all the words. I had the mixture made and ready to eat in about 4 hours (including setting time.)

Fortunately, there was one left over, so I am off to enjoy it now. Jelly for lunch? Yes please! It is Valentine’s Day after all, and this is my gift to myself.

X Bree

Real strawberry jelly

Real strawberry jelly

Real strawberry jelly

delicious. magazine Feb 2011: Issue 101, p 144

3 x 250g punnets ripe strawberries, hulled

180g caster sugar

1 tbs lemon juice

3 tsp powdered gelatine

300ml thickened cream, lightly whipped

Halve 500g strawberries. Place the sugar and 1 1/2 cups (375ml) water in a large pan over high heat, stirring to dissolve sugar. Bring to the boil, then reduce heat to medium and simmer for 5 minutes until slightly reduced. Add lemon juice and halved berries to the pan, then reduce heat to medium-low and simmer, stirring occasionally, for 10 minutes until berries are soft. Carefully transfer berry mixture to a fine sieve set over a bowl, and stand for 40 minutes or until most of the liquid has drained from the berries. (Don’t push down on the berries or the jelly will be cloudy.) Discard solids.

Return the berry syrup to the pan over medium heat for 2-3 minutes until hot but not boiling. Transfer 1/2 cup (125ml) hot syrup to a large bowl, then sprinkle over gelatine and stand for 2 minutes. Whisk to completely dissolve gelatine, then stir in the remaining syrup. Transfer to a jug and chill for 20-30 minutes, stirring regularly, until jelly is thick, but not set.

Pour the jelly into four 150ml serving glasses and return to the fridge for a further 10-15 minutes until starting to firm up.

Meanwhile, slice the remaining berries.

Gently press most of the berry slices into the jelly – being careful not to disturb the jelly too much. Return to the fridge for 6 hours to set. (Jellies can be kept in the fridge for up to 2 days at this point.)

Just before serving, spoon a dollop of whipped cream over each jelly, then top with remaining berries and serve.

1 Comment

Filed under family friendly, February

Monday night dinner, fast and fresh

These are the kind of dinners I like to cook. You know the ones? It’s Monday night. Fridge is near empty after the weekend. Too tired to go shopping. What to cook? Enter Minced chicken with Thai basil. And it’s low-fat!

It turns out my fridge was emptier than I first thought. The basil I had bought on the weekend had seen better days so I substituted it for some of that herb in a tube stuff. No harm done. The lettuce I bought seemed to be flood affected and was in no way going to form the perfect little cups it was supposed to (a la san choy bow style). So in the end I formed a kind of warm salad.

Minced chicken with Thai basil

Minced chicken with Thai basil

The lettuce is a crucial ingredient, don’t be tempted to replace it or leave it out. The combination of fish sauce, oyster sauce and kecap manis makes the mix really salty and the lettuce somehow cuts through that. It also benefits from the addition of the (optional) jasmine rice. I stirred it through the chicken mince mixture which helped bulk out the meal.

Of all people, B4 proclaimed dinner “yum”. I was shocked as he is always the first to complain when there is visible green things in his dinner (in this case, thinly slice kaffir lime leaves). He must have been hungry!

This is a cheap, quick, family friendly meal. Try it.

X Bree


Leave a comment

Filed under February, low fat, Monday night

A delicious breakfast

I am so thankful to have such a wonderfully supportive family.

When I first toyed with the idea of starting a blog, they were the ones who encouraged me to take a leap of faith, providing me with the confidence I needed to get started.

However, when my older sister asked me to cater her boardroom breakfast last Friday morning, my initial gut reaction was to say “no”. But if there is one thing I have learnt since starting this blog, it is that every time I post something here I am forcing myself out of my comfort zone. And that is why I actually said “yes”!

For the purposes of keeping it simple but still delicious, I ventured a little bit outside of “February” in order to come up with my menu. Please forgive me for breaking “the rules”.

A Delicious Breakfast

A Delicious Breakfast

Here it  is :

I spent Thursday shopping and preparing for Friday morning. The omelette’s and fruit salad I would need to make fresh on Friday morning before delivery, however the rest I made in advance.

This was the first time I had cooked rhubarb. I was a little bit nervous. I found that the rhubarb needed to be cooked twice as long as what the recipe said. In the end, it didn’t hold its shape well, but it was sweet and cinnamony with a jammy consistency. Allowing the flavours to infuse overnight certainly didn’t do any harm. 

The bircher muesli was simple. Combine the oats with the freshly squeezed oj. Add the yoghurt and grated apple in the morning and spoon into the jam jars. I cannot believe how creamy and lush the end result was, with only the use of greek yoghurt. It tasted far naughtier! As for the sweet dukkah. Yum! Yum! Yum! I still have a little secret stash and have been trying to find excuses to sprinkle it on everything! You must try it. Even if you don’t make the bircher muesli. Sprinkle it on yoghurt, fresh fruit, poached fruit. Put a spoonful onto sweet muffins before you bake them. Whatever you can find. It is just so yummy. This will become a staple in my pantry.

For the fruit salad I just went out and bought the best seasonal fruit I could find – green grapes, red paw paw, raspberries, blueberries, passionfruit, pineapple, yellow nectarines, bananas, freshly squeezed orange juice. The result? Summer in a cup. I served it with more of the plain greek yoghurt and of course, sweet dukkah. The secret was to select perfectly ripe fruit. I am one of those weird people who sniff my fruit before I buy it. It has to have the smell of what you’re buying. If it doesn’t, don’t bother.

Ginger and almond slice

Ginger and almond slice

The ginger and almond slice was very easy. Except…I am currently without a mixer. My last one smoked up before Christmas and since then I have been avoiding all recipes that include “cream butter and sugar”. I don’t know what I was thinking when I emailed the confirmed menu through to my sister, but once I read the recipe properly and saw those four words “cream butter and sugar”, I panicked! So with nothing to lose (I had all the ingredients and I wasn’t about to change recipes) I made it in my food processor with the pastry blade. Surprise, surprise it turned out great. It rose like it should. It browned like it should. It tasted oh so good. Chewy, gingery goodness.

I can’t remember the last time I voluntarily got up at 4:30am in the morning. In actual fact I was awake at 3:30am! I was excited and nervous. I was about to cook something I had never cooked before for eight strangers. That’s how much confidence I had in the recipes in delicious. magazine.

I cooked the individual potato and chive omelette in muffin pans which meant they cooked quickly but would still be warm when I got to the venue. I sliced all the fruit and placed it in a bowl, ready for gentle tossing when I arrived.

Individual potato and chive breakfast omelette served with smoked salmon and crème fraiche

Individual potato and chive breakfast omelette served with smoked salmon and crème fraiche

In some kind of miracle I packed my esky, without actually forgetting anything, and headed off to Chelmer at 6:00am.

When I arrived I quickly assembled everything and presented it on the boardroom table, leaving quickly before all the guests arrived.

Success!

If there is one thing I learned out of this exercise it is to push myself more often this year. Say yes more often. When my gut says no (because it could be too hard or because I might fail or embarrass myself), say yes and just do my best. Because my best can be good enough!

X Bree

What is your favourite special breakfast recipe?

When was the last time you forced yourself out of your comfort zone and achieved success?

4 Comments

Filed under February, ground rules

When one little thing ruins a perfectly good plan

Hello friends,

It’s funny how one little thing can ruin a perfectly good plan.

There I was on Wednesday, all ready to make the February 2010 cover recipe, Bill Granger’s cumin-spiced lamb with fresh mango chutney, for dinner. I’d carefully chopped the green chilli, ginger and garlic as finely as I could. I’d measured out the garam masala and turmeric and squeezed the lime juice. I mixed it all together to make a delicious marinade. So far so good.

Off to the fridge I went to get out my lamb cutlets. When I opened the plastic, I knew straight away – rotten!! Now I don’t know about you, but lamb cutlets are a luxury in my house. My kids love them! But with a $30/kg + price tag, they are a rarity. I was foul! Furious!

In a frenzy I rummaged through my handbag to find the receipt. Having only bought them on Monday, I was hoping that for one time in my life I had somehow kept it. Yes! Next, a phone call to the store manager to voice my anger and request a refund or return. No problem she says. Just bring it back as soon as you can. Next, a quick phone call to Mr Picky Palette and a plea to him to visit the big red supermarket chain and replace them for me. Yes dear.

By now, it was too late. B2 and B4’s dinner cries were reaching a crescendo! What to do? So I bailed on the idea of cooking the lamb cutlets as planned. I was out of time and out of lamb! Dinner was saved by a frozen salmon fillet and a few salad items hiding in the fridge. Kids were fed! Phew…

Mr Picky Palette arrived home soon after. Replacement lamb cutlets were put in the freezer to be served another day.

X Bree

Leave a comment

Filed under February